HEXFLOW
Complete Rulebook
1. Game Overview
HEXFLOW is a strategic 2-3 player (expandable to 4-players) board game of connection and interference played on hexagonal board with 6 hexes on each side. Players race to build a continuous path from their 'Start' corners to the opposing 'Goal' corners using hexagonal tiles engraved with routing lines that run strictly from flat-side midpoint to flat-side midpoint.
The game elegantly blends the spatial reasoning of connection games like Hex and TwixT with the tactical tile-laying of Carcassonne. Every placement is permanent, every rotation matters, and a single well-timed Block tile can derail an opponent's carefully laid plans. Whether played as a lightning-fast Race, a cutthroat Battle, or a chaotic three-way battle, HEXFLOW rewards foresight, adaptability, and nerve.
Designer Note: "The key insight that birthed HEXFLOW was this: in Go, a stone's liberties are its life. In HEXFLOW, a tile's liberties are its lines. Every tile you place breathes connection into the board -- or suffocates your opponent's plans." -- B.W.Evans
Number of Players: 2-3 (standard) or 3(With optional Tri-Board Mode)or 4 playing as 2 teams of 2 players
Playing Time: 20--40 minutes (Race/Point Mode), 30--45 minutes (Battle Mode)
Ages: 10+
Complexity: Medium -- easy to learn, lifetime to master
2. Components
2.1 The Game Board -A 6 hex/sided Hexagonal Board
The primary Game Board is a hexagonal board with 6 hexes on each side. The board contains 91 hexagonal spaces for tile placement arranged on a 6 hex/sided Hexagonal honyecomb design.
Corner Labels:
- I Corners:
- II Corners:
- III Corners:
The corners are permanently engraved with their respective letter. In modes that use scoring dots, groups of 2, 3, 4, and 5 dots are engraved on specific hexes to act as score multipliers. These dot hexes are positioned symmetrically to ensure neither player has an inherent advantage.
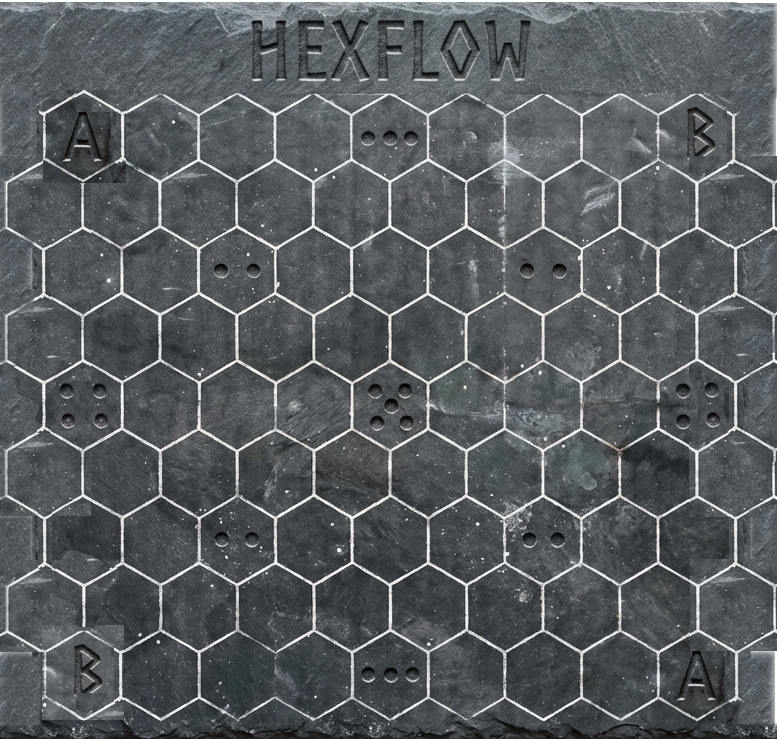
         II_______________I
         / \             / \
        /   \           /   \
       /     \         /     \
      /       \       /       \
     /         \     /         \
    /           \   /           \
   III------------X------------III
     \          /   \          /
      \        /     \        /
       \      /       \      /
        \    /         \    /
         \  /           \  /
          \/_____________\/
          I               II

  [A hexagonal board with 6 hexes on each side Hex Grid -- 91 Playable Hexes]
2.2 The Triangle Board (3-Player)
The Triangle Board is the original secondary board design for 3-player games.It has 14 hexes per side(*Until the Heagonal Board design became the primary board dsign used. But in Online game there is a board creation section so players can create whatever shaped board they desire. Although I have put a lot of time into designing the current Board designs and have place the point dot modifiers in specific places strategically...There is a method to the madness!) The Triangle Board features:
- 3 Corner Positions labeled with Roman numerals(*like the main Heaxgonal Board): I, II, and III
- A Center Cluster of 3 adjacent hexes at the board's heart is where it differs greatly and creates a different type of game strategy.
- Total hex count: 91 playable hexes
The triangular shape creates three natural "lanes" from the corners toward the centre, with symmetrical distances that are balanced through the turn-order system (see Section 4.3).
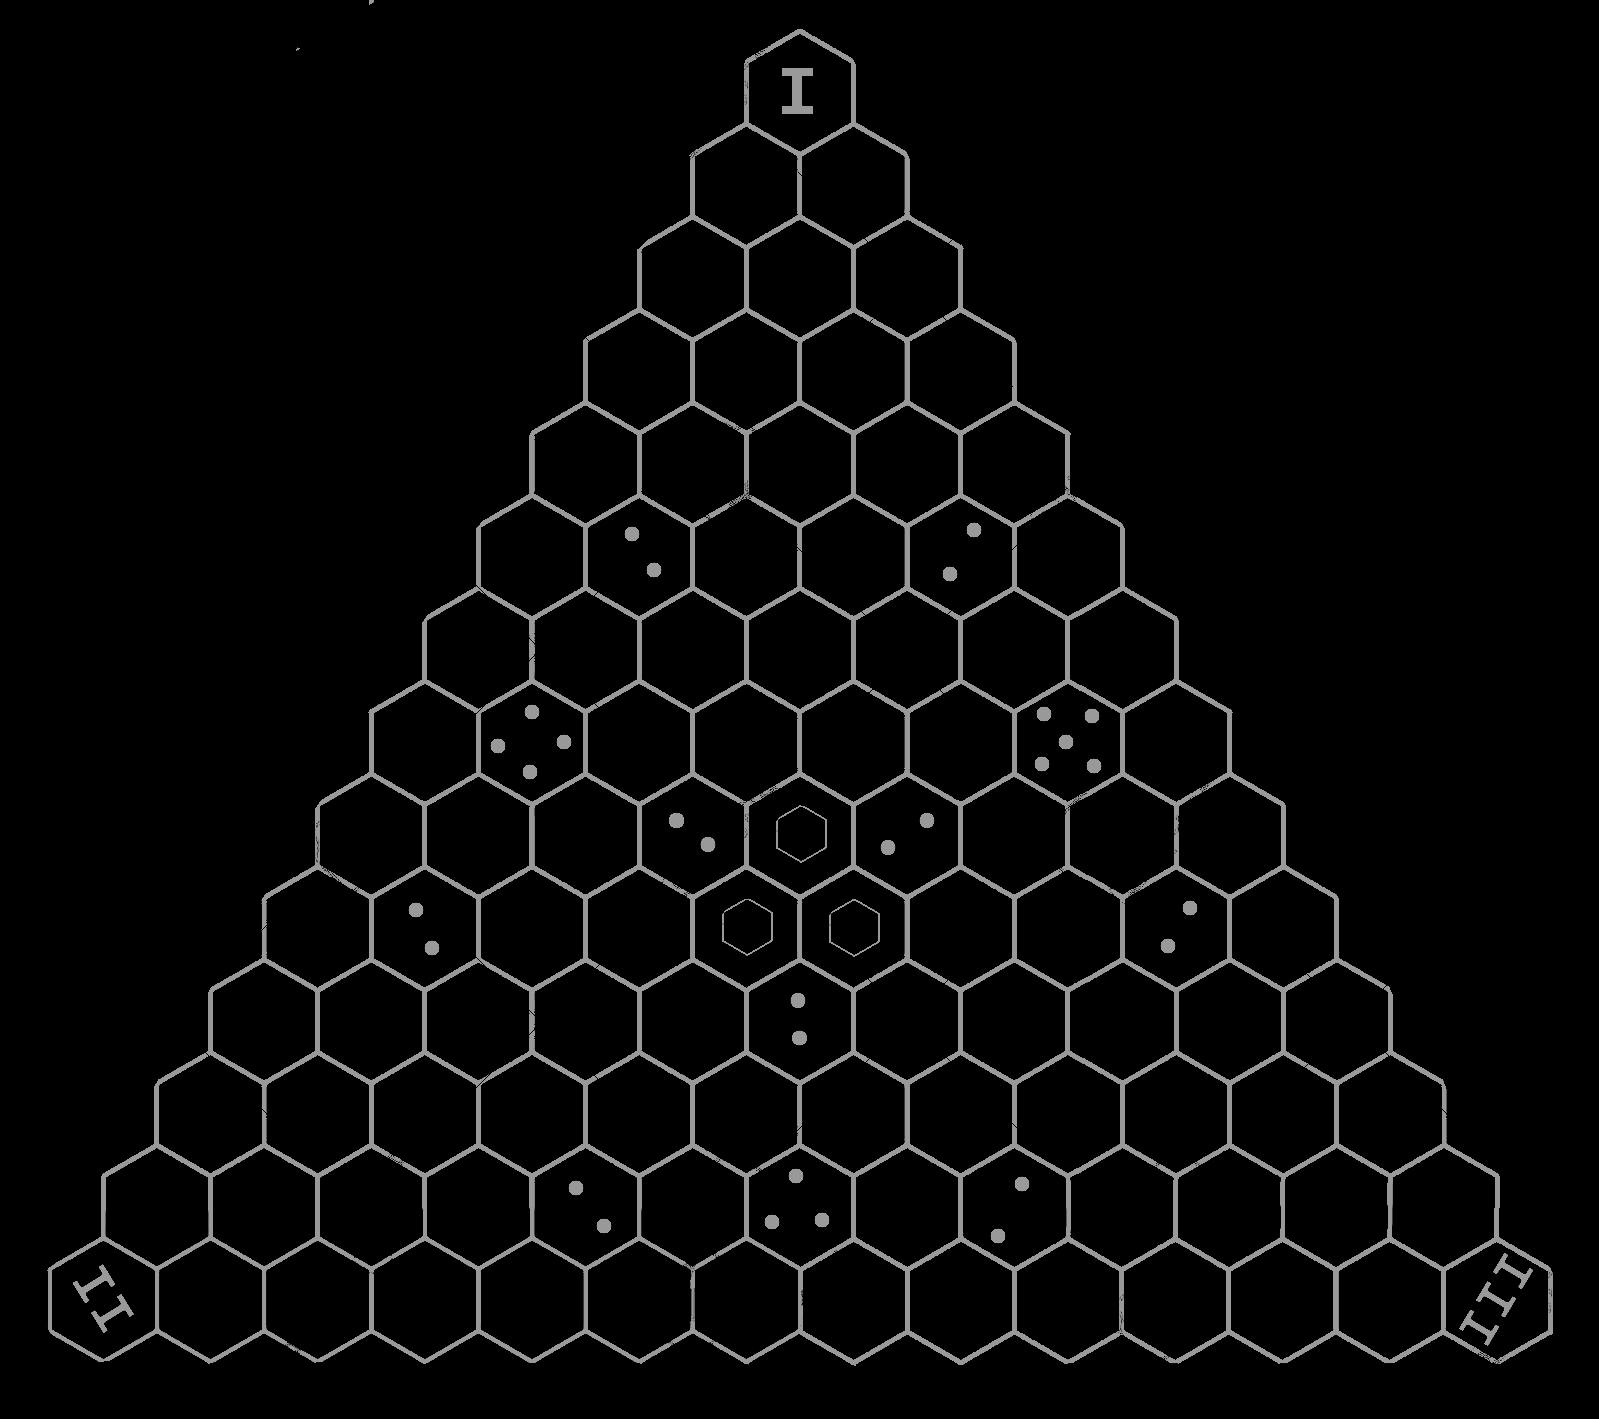
 I
           / \\
          /   \\
         /     \\
        /  [C]  \\        [C] = Center Cluster (3 hexes)
       /    ·    \\
      /           \\
    II-------------III
    [14 hexes per side · 91 total]
2.3 Hex Tiles
Each player receives 22 hexagonal tiles in their colour:
- Player I -- Black tiles: Dark tiles with white engraved lines
- Player II -- White tiles: White tiles with dark engraved lines
- Player III -- Grey tiles: Grey tiles with dark engraved lines
Each player's set contains 11 unique tile types, with 2 copies of each type (22 tiles total per player). All tiles are identical in size and shape, fitting precisely within the board's hexagonal spaces.
Tiles are drawn randomly from an opaque bag. Each player maintains a hand of 3 tiles at all times during play.
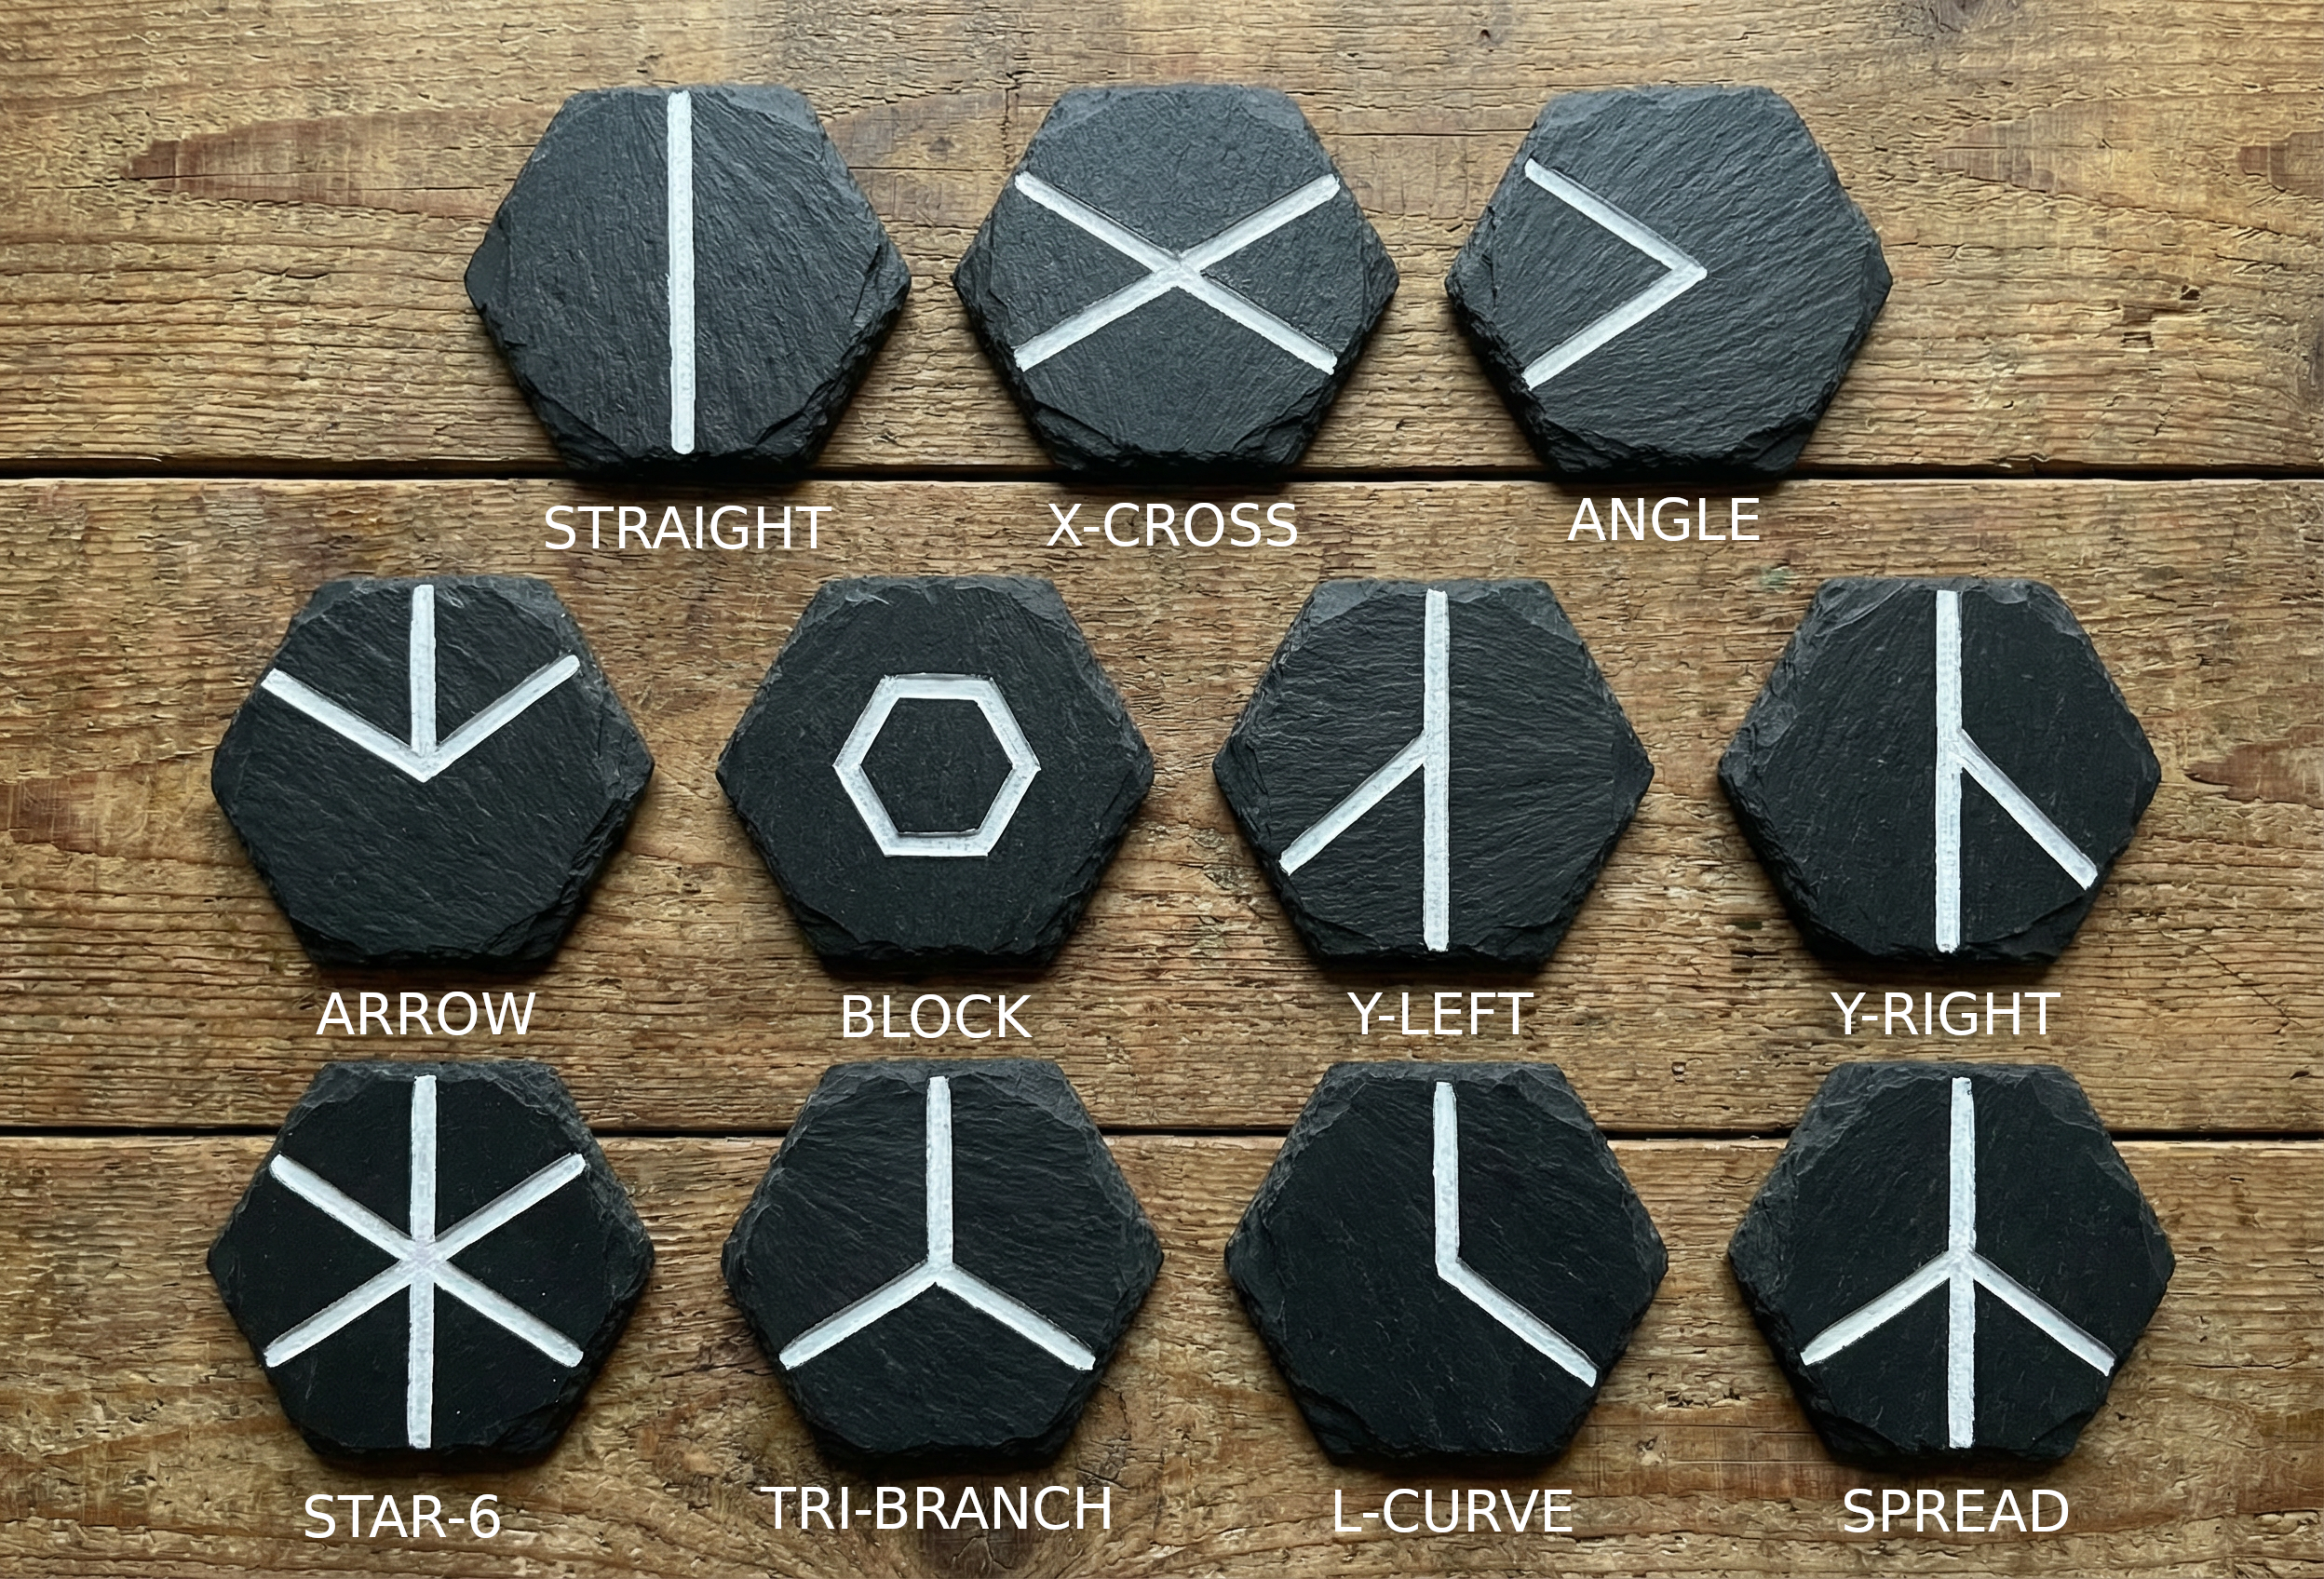
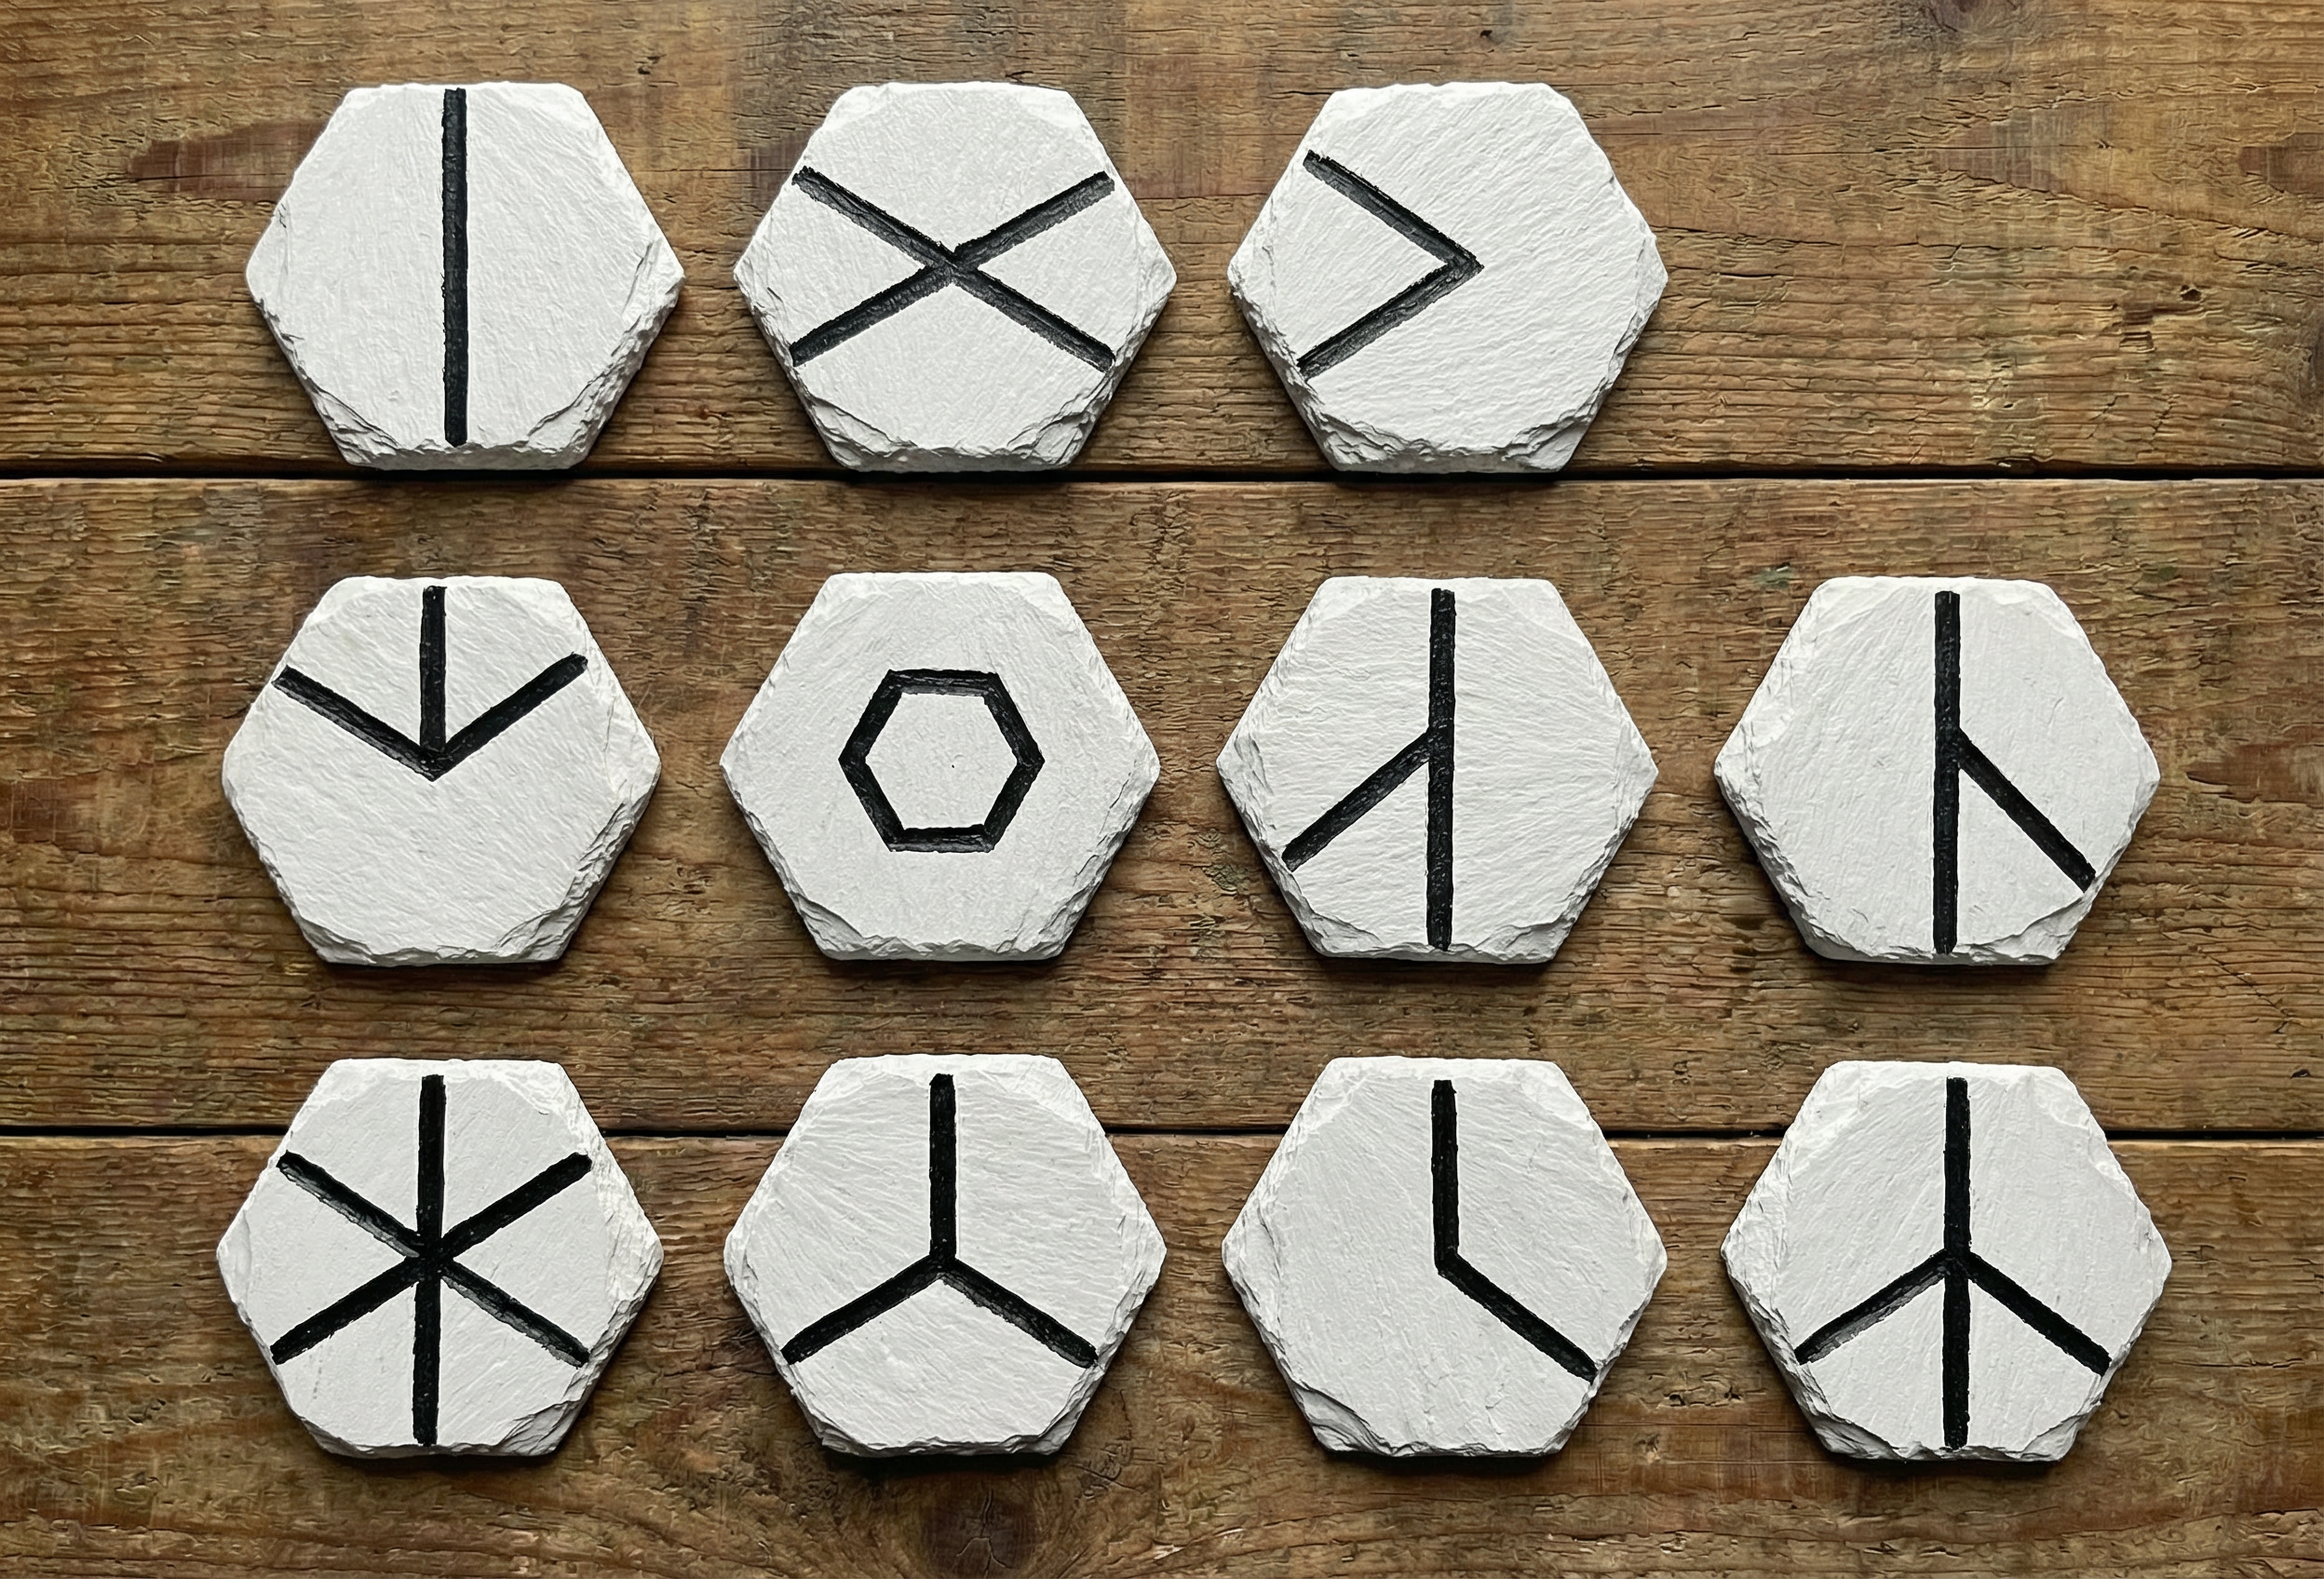
2.4 Tile Types Reference Table
All lines on HEXFLOW tiles run from the midpoint of one flat side to the midpoint of another flat side. The six sides are named: T (Top), TR (Top-Right), BR (Bottom-Right), B (Bottom), BL (Bottom-Left), and TL (Top-Left).
| # | Points | Name | Connections | Description |
|---|---|---|---|---|
| 1 | 2 | Straight | T ↔ B | Direct vertical pass-through |
| 2 | 4 | X-Cross | T-B + TR-BL | Two independent crossing lines |
| 3 | 2 | Angle | T ↔ TR | Short 60-degree bend |
| 4 | 3 | Arrow | T to TR+TL | Splits from top to all three upper sides |
| 5 | 1 | Block | None | Inner hexagon; no exits; pure blocker |
| 6 | 3 | Y-Right | T-B + BR | Straight with branch to bottom-right |
| 7 | 3 | Y-Left | T-B + BL | Straight with branch to bottom-left |
| 8 | 5 | Star | All 6 Sides | Three lines through center; connects everywhere |
| 9 | 3 | Tri-Branch | B to TR+TL | Y-shape from bottom to upper sides |
| 10 | 2 | L-Curve | T ↔ BR | A 120-degree Angle |
| 11 | 4 | Spread | T to B+BR+BL | Resembles a Peace sign or Algiz rune inverted |
Total tiles per player: 22 (2 copies each of 11 types)
Total tiles in game: 44 (both players combined)
3. Core Concepts
3.1 How Tiles Connect
Two adjacent tiles are connected at their shared edge if and only if:
- They share a flat hex edge (they are orthogonally adjacent on the hex grid), AND
- Both tiles have a line endpoint at the midpoint of that shared edge.
The connection midpoint is at the centre of the shared flat edge. This is the fundamental rule of HEXFLOW routing.
When two connected tiles share an edge midpoint, a path may travel from one tile into the other. The path can then continue through any other connected edge of the second tile, effectively "routing" through the tile's engraved lines.
Key Principle: Only flat-side midpoints where lines connect matter. Like the dots in Dominos must be the same to connect.
3.2 The Liberty Principle
HEXFLOW draws inspiration from Go's concept of liberties -- the empty points adjacent to a stone group that keep it alive. In HEXFLOW:
- A tile's liberties are its line endpoints at flat-side midpoints.
- Each line endpoint on a tile represents a potential connection point (a "liberty") where another tile's line can join.
- A tile with no line endpoints at its edges (the Block tile) has zero liberties -- it cannot connect to any path.
- A Star tile has six liberties -- the maximum possible.
Understanding liberties is essential for both building your own path and disrupting your opponent's. When you place a tile adjacent to an existing tile, you are either adding liberties to the board (extending a path) or sealing them off (blocking).
3.3 Path Rules
A path is a continuous sequence of connected tiles that forms an unbroken route across the board. A valid winning path, or 'Hexflow', must satisfy all of the following(but is not the only way to win):
- Continuity: Every tile in the path must be connected to the next tile via a shared flat-edge midpoint where both tiles have line endpoints.
- Endpoint Alignment: The path must begin at a tile placed on one of the player's starting corners and end at a tile placed on (or connected to) one of the opponent's corners.
- Traversal Direction: A path may enter and exit a tile only through its line endpoints. The internal engraving of the tile determines which routes are possible.
- Branching Allowed: A tile may have multiple outgoing paths (branching), but only one continuous route to the destination is required to win.
- Opponent Tile Usage: Paths may travel through opponent tiles if and only if the line endpoints connect at the shared edge midpoints.
- Block Immunity: The Block tile cannot carry any path segment for either player. It has no line endpoints and thus no liberties.
Designer Tip: "The most elegant wins in HEXFLOW often involve threading your path through an opponent's tiles -- turning their own infrastructure against them. Never overlook the possibility of a 'hijacked' route."
4. Game Modes
4.1 Race or Point Mode (Standard 2-Player)
Race Mode is the flagship experience of HEXFLOW -- a pure contest of speed, efficiency, and interference. Both players begin from diagonally opposite corners and race to be the first to build an unbroken path to the other side- a 'HEXFLOW'. *An alternate way to win is to prevent the other player(s) from reaching their 'Goal' corner, called a 'HEXLOCK'. Used in game play similarly to the chess term 'Checkmate'. HEXFLOW and HEXLOCK actions are only used in the main Race Mode Expcept for the first to create a 'HEXFLOW' can declare it during point mode which signifies the final stretch of the game. Point Mode is played the same as race but with one exception the winner is determined by the final point tally, not by being the first to their 'Goal' corner. A player reaching their 'Goal' Corner recieve 30 points added to their final score tally. And the player contue playing until they have usd all there tile up.
4.1.1 Setup
- Place the board between players. Player I owns corners I. Player II owns corners II.Player III owns corners III.
- Each player takes all 22 tiles of their colour and places them in an opaque bag.
- Each player draws 3 tiles to form a starting hand.
- Each player takes all 22 of their colour tiles and places them in an opaque bag or container. Each player draws 3 tiles to form their starting hand. Do not reveal your tiles to your opponent.
- After each tile is played, draw a replacement so you always maintain 3 tiles in hand.
- Flip a coin to or roll a dice determine who goes first. The winner of the flip chooses whether to play first or last.
4.1.2 Turn Structure
On your turn, perform all three steps in order:
Step 1 -- Select and Orient a Tile:
Choose any tile from your hand. You may rotate it to any of six orientations (0, 60, 120, 180, 240, or 300 degrees) before placing it. Consider your choice carefully -- once a tile is placed,and the finger leaves the tile it cannot be moved or re-rotated.
Step 2 -- Choose a Board Position:
- On your first turn, you must place your tile on one of your two 'Start' corner hexes.
- On all subsequent turns, you must place your tile on an empty hex that is adjacent (shares a flat edge) to at least one tile already on the board, and at least one line must connect to a previously placed tile's line.
Step 3 -- Place and Check:
Confirm placement by setting the tile onto the chosen hex at the chosen rotation. Check whether a winning path or 'HEXFLOW' has been completed on the corresponding 'Goal' corner hex. If yes, (in Race Mode)the moment you complete a valid path from your 'Start' corner to your 'Goal' corner(declare 'HEXFLOW'!,you win) or if prevent an opponent from being able to make a continuous path to their 'Goal' corner with the tiles remaining, you win(declare 'HEXLOCK'). The game ends immediately.(In 'Point Game Mode' you continue to play even after a player has reached Their 'Goal' which they gain 30 points to add to the final point tally. If no, pass the turn to your opponent.
Placement Finality Rule: Once your finger has left the tile, placement is final -- exactly as in chess or checkers. Touch-move etiquette applies.
4.1.3 Placement Rules
- First Placement: Your first tile of the game must be placed on one of your own 'Start' corner hexes.
- Adjacency Requirement: All subsequent tiles must be placed on an empty hex adjacent to at least one existing tile.
- Connection Requirement: At least one line on your placed tile must connect to a line on an adjacent tile already on the board. You cannot place an "orphan" tile with no connections.
- Rotation: You may rotate your tile to any of 6 orientations before placing. No post-placement rotation is permitted.
- One Tile Per Hex: No stacking or replacing tiles. Once a hex is occupied, it remains occupied for the rest of the game.
- Blocking Is Legal: You may place tiles -- including Block tiles -- specifically to interfere with or redirect your opponent's path. You may place adjacent only to opponent tiles if the lines connect.
- Mandatory Placement: You must place exactly one tile per turn. Passing or skipping is never permitted.
4.1.4 Winning & Scoring
Immediate Win:
The moment a player places a tile completing a valid continuous path from their starting corners to their opposite corners, that player wins immediately. The game ends at that moment -- no further tiles are played.another Auto win is if a player places a block tile and stops their opponents line and they have no other branches to allow their line to make it to their opposite corner.
Scoring Dots (for Tournament/Extended Play):
Engraved dots on specific board hexes act as score multipliers when a winning path passes through them:
| Dots on Hex | Score Multiplier |
|---|---|
| 2 dots | ×2 |
| 3 dots | ×3 |
| 4 dots | ×4 |
| 5 dots | ×5 |
Base score for winning: 10 points.
In extended points mode or tournament play, multipliers from multiple dot hexes on the winning path stack additively. Final Points Accumulation Example: Winning Path through 2-dot + (2)3-dot hexes = 10 × (2 + 3 + 3) + 30(winning bonus) = 110 points
Draw Resolution:
If all the board spaces are filled with no winner (extremely rare), the player whose path reaches furthest toward the corresponding 'Goal' corner wins. Measure by counting the number of connected tiles in the longest chain toward the goal. If equal, the game is a draw.
Simultaneous Completion:
If both players somehow complete winning paths via the same placement (possible through X-Cross or Star crossing tiles), the active player (the one who just placed the tile) wins.
4.2 Battle Mode (Combat 2-Player)
4.2.1 Overview & Concept
Battle Mode transforms HEXFLOW from a pure race into a contest of territory, control, and surgical strikes. Rather than starting from diagonal corners, players begin from opposite sides of the board -- Player A from both left-side corners, Player B from both right-side corners. Their paths are destined to clash in the board's contested centre, where tile displacement, capture chains, and territorial denial decide the victor.
The defining feature of Battle Mode is the Transit Rule: you cannot simply ride your opponent's lines to reach your goal. Lines on tiles you placed belong to you; lines on tiles your opponent placed belong to them. The centre of the board becomes a war zone where every placement carries both offensive and defensive weight.
Designer Intent: "Race Mode is a marathon. Battle Mode is a fencing match -- every advance is also a parry, and the centre of the board is the piste where blades cross."
Key Differences from Race Mode:
- Board orientation: left vs. right sides instead of diagonal corners
- The Transit Rule restricts path usage by tile ownership
- Tile displacement allows limited removal of opponent tiles
- Capture scoring provides an alternative win condition
- Stalemate resolution uses a comprehensive scoring rubric
4.2.2 Setup
- Board Orientation: Place the 9x9 board so that the left edge and right edge are the starting flanks:
- Player A owns the two left-side corners (top-left and bottom-left). These are marked with the A symbol in Battle Mode.
- Player B owns the two right-side corners (top-right and bottom-right). These are marked with the B symbol in Battle Mode.
- Goal Assignment:
- Player A must build a path from either left-side corner to either right-side corner.
- Player B must build a path from either right-side corner to either left-side corner.
- Territorial Division:
- Player A's Territory: Columns 1--3 (left third of the board)
- The Contested Zone: Columns 4--6 (central third)
- Player B's Territory: Columns 7--9 (right third)
- Tile Distribution: Each player receives their full set of 22 tiles (11 types x 2 copies), identical to Race Mode. Place all tiles in your opaque bag, draw 3 for your starting hand, and maintain 3 tiles in hand throughout the game.
- Displacement Tokens: Place 3 displacement tokens of each player's colour near the board. These track how many tile displacements each player has remaining.
- Capture Piles: Designate a capture pile area for each player. Captured tiles are placed here, visible to both players.
- First Player: Roll a die or flip a coin. The winner chooses to play first or second.
    B ····························································· B
    ·  [A Territory]  [  Contested Zone  ]  [B Territory]  ·
    ·  Columns 1-3    Columns 4-8        Columns 9-11      ·
    · *Note-proper board placement-position II is column 7 ·
    A ····························································· A

    [Player A starts left · must reach right]
    [Player B starts right · must reach left]
4.2.3 The Transit Rule (Enemy Territory)
The Transit Rule is the defining strategic mechanism of Battle Mode. It governs which tiles your path may use.
Core Principle:
- You may use any connected line to advance your path as long as the tile was placed by you.
- You may also use lines on tiles in the Contested Zone (columns 4--6), regardless of who placed them.
- You MAY NOT use lines on tiles placed by your opponent that are located in their Territory (the third of the board closest to their starting side).
Formal Definition:
- A path segment is transit-valid if it passes through:
- Any tile you placed (anywhere on the board), OR
- Any tile in the Contested Zone (columns 4--6, regardless of owner), OR
- Your own starting corner hexes (considered part of your territory).
- A path segment is transit-invalid if it passes through:
- An opponent-placed tile located in their territory (their third of the board).
Checking Transit Validity:
When evaluating a potential winning path, trace the route from your starting corner to the destination. The path is valid only if every tile in the opponent's territory along that route was placed by you. Any opponent-placed tile in their own territory breaks the transit chain -- you cannot "ride their rails" through their homeland.
Important: Transit validity is checked per-tile, not per-line. Even if an opponent's tile in their territory has a line that perfectly connects to your path, you cannot use it. The tile itself is "enemy infrastructure" and is denied to you.
The Contested Zone Exception:
The central third of the board (columns 4--6) is neutral ground. Any line, on any tile, in this zone may be used by any player. This creates a natural funnel where paths converge and the game's most intense tactical exchanges occur.
4.2.4 Tile Combat & Displacement
Since both players advance toward each other from opposite flanks, their paths inevitably clash in the Contested Zone. Displacement is the surgical tool for breaking through a congested centre.
Displacement Basics:
Under certain conditions, you may remove an adjacent opponent tile from the board and replace it with one of your own. The displaced tile goes to your capture pile.
What Can Displace:
Only two tile types have the "weight" to displace an opponent's tile:
| Displacer Tile | Effect |
|---|---|
| Block (1 point) | May displace any adjacent opponent tile. The Block replaces it. |
| Star-6 (5 points) | May displace any adjacent opponent tile. The Star-6 replaces it. |
Displacement Conditions:
All of the following must be true to perform a displacement:
- You are placing either a Block or a Star-6 tile from your hand.
- The placement hex is adjacent to at least one opponent tile.
- You have at least one displacement token remaining.
- The target opponent tile is not on a starting corner hex.
- The displacement would not leave any tiles on the board illegally disconnected (i.e., no "orphaned" tiles without adjacent connections).
Displacement Procedure:
- Announce your intent to displace.
- Select one adjacent opponent tile as the target.
- Remove the target tile from the board and place it in your capture pile.
- Place your Block or Star-6 tile on the now-empty hex.
- Discard one displacement token.
- Check for a winning path.
Displacement Limits:
Each player may perform a maximum of 3 displacements per game. This is tracked using the 3 displacement tokens. Once all three tokens are used, no further displacements are possible for that player. Use them wisely.
Displacement Strategy Notes:
- Early displacement clears a path through the centre.
- Mid-game displacement can sever an opponent's nearly complete route.
- Late-game displacement is a desperation move -- save at least one token for the endgame.
- Displacing with a Block creates a dead zone. Displacing with a Star-6 creates a superhighway.
4.2.5 Capture Scoring
Captured tiles represent battlefield victories and contribute to an alternative scoring path.
Capture Points:
Each tile in your capture pile is worth 2 points at game end, provided no player has won via path completion.
Capture Pile Visibility:
Captured tiles are placed face-up in a pile visible to both players. This allows both players to track the capture score and factor it into decisions.
When Capture Scoring Applies:
Capture points matter in two scenarios:
- Stalemate Resolution (board fills with no winner): see Section 4.2.7.
- Tournament Play: Captured tiles serve as a tiebreaker in bracket formats.
4.2.6 Turn Structure
Battle Mode follows the standard Race Mode turn structure with one addition:
Step 1 -- Select and Orient a Tile:
Choose any tile from your hand and rotate to your desired orientation.
Step 2 -- Choose a Board Position:
- First placement must be on one of your starting corner hexes.
- All subsequent placements must be adjacent to an existing tile, with at least one line connection.
- If placing a Block or Star-6, you may declare a displacement at this step (see 4.2.4).
Step 3 -- Place, Resolve Combat, and Check:
Place the tile. If displacing, remove the target opponent tile to your capture pile and discard a displacement token. Then check for a winning path. Turn passes.
4.2.7 Winning & Stalemate
Winning by Path:
Identical to Race Mode: the first player to complete a valid, transit-compliant path from their starting side to the opponent's side wins immediately.
Transit Compliance Check:
Before declaring victory, verify that your path does not pass through any opponent-placed tiles in their territory (columns 1--3 for Player B, columns 7--9 for Player A). Paths through the Contested Zone or through your own tiles anywhere are always valid.
Simultaneous Completion:
If a placement completes paths for both players, the active player wins. If the active player's path is transit-invalid, it does not count, and the opponent wins instead.
Stalemate Resolution (Board Fills with No Winner):
If all 85 hexes are filled and no player has completed a valid path, calculate the Stalemate Score for each player:
| Criterion | Points |
|---|---|
| Longest transit-valid path toward goal (count tiles) | 1 per tile |
| Captured tiles | 2 per captured tile |
| Dot hexes on longest path (multiplicative) | ×3 / ×4 / ×5 / ×6 per dot hex |
The player with the highest Stalemate Score wins. If tied, the game is a draw.
Stalemate Score Calculation Example:
- Player A: Longest path = 12 tiles, Captured tiles = 4 (8 pts), One 2-dot hex on path
Score: 12 + 8 + (12 × 3) = 56 points - Player B: Longest path = 10 tiles, Captured tiles = 6 (12 pts), One 3-dot hex on path
Score: 10 + 12 + (10 × 4) = 62 points - Result: Player B.W.ins the stalemate.
4.2.8 Battle Mode Strategy
Territorial Control:
- Secure your territory early with efficient routing. You want your own tiles to form the backbone of your path through your own third of the board.
- Force your opponent to path through the Contested Zone, where you can interfere with their tiles.
Displacement Timing:
- 3 displacements per game sounds like many, but they vanish quickly. Save at least one for the endgame.
- Using a Block to displace creates a wall. Using a Star-6 to displace creates a universal connector.
- Consider displacing an opponent's key branch tile (Arrow, Spread, Tri-Branch) to destroy multiple path options at once.
The Contested Zone Gambit:
- Tiles in the centre are shared infrastructure. Place Star-6 and X-Cross tiles there to create routes you control but your opponent may be tempted to use -- then displace them when they commit.
- Arrow and Spread tiles in the centre create "toll booths" -- your opponent may use the lines, but you choose which branches live and die.
Corner Play:
- In Battle Mode, you have two starting corners on the same side. You can build toward either destination corner on the far side.
- Watch which destination corner your opponent is targeting and block that flank.
- Building from both corners simultaneously creates a pincer effect.
Capture Awareness:
- Every tile you capture is 2 stalemate points. In a tight game, captures decide the outcome.
- If you are behind on the path race, shift to a "scorched earth" strategy: displace aggressively and build for the stalemate.
Advanced Tip: "The best Battle Mode players think like Go masters: every tile placement claims territory, every displacement is a capture, and the endgame is won or lost by who controls the centre."
4.3 Tri-Board Mode (3-Player)
4.3.1 Overview & Concept
Tri-Board Mode introduces a third player to HEXFLOW, transforming the contest into a chaotic, three-way race for the centre. Rather than trying to reach the far side of the board, each player's goal is to be the first to create a continuous path from their starting corner to any one of the three centre hexes
Tri-Board Mode is the most social and cutthroat of the three modes. With three players, blocking becomes a diplomatic weapon: a block placed to hinder one opponent may inadvertently help the other. Alliances form and dissolve in a single turn. The centre is a shared prize that only one player can claim.
Designer Note: "Tri-Board HEXFLOW is where the game becomes poker. You read your opponents, you time your blocks, and you pray that the player to your left is more worried about the player to their left than about you."
4.3.2 Board Description
The Triangle Board is an equilateral triangular grid of hexes with 14 hexes per side. Its key features are:
- 3 Corner Positions labeled with Roman numerals I, II, and III
- A Centre Cluster of 3 adjacent hexes at the geometric centre
- Total hex count: 91 playable hexes
Layout Details:
The board is structured as stacked rows of hexes, with the number of hexes per row increasing from the corners toward the centre, then decreasing. The three centre hexes form a small triangle at the board's heart and are the shared goal.
                    Corner I
                       o
                      / \\
                     /   \\
                    /     \\
                   /   ·   \\
                  /         \\
                 /   [CCC]   \\       [CCC] = Centre Cluster
                /   ·  ·  ·   \\        (3 hexes)
               /               \\
    Corner II o-----------------o Corner III
         [14 hexes per side]
Corner Positions & Path Lengths:
| Corner | Relative Position | Approx. Distance to Centre | Turn Order (for variant rule-best point access to starting position)(otherwise you can start in the order that you rolled the dice in like regular game) |
|---|---|---|---|
| I | Top vertex | (~8 hexes) | 2nd (moves second and is in the middle road for access to points) |
| II | Bottom-left vertex | (~8 hexes) | 3rd (moves last and best for points access) |
| III | Bottom-right vertex | (~8 hexes) | 1st (first move and worst for point access) |
Balance Note: The player closest to the centre (Position I) goes last, giving the two farther players a head start. This reverse-order balancing creates roughly equal winning chances across all three positions.
4.3.3 Setup & Starting Positions
- Determine Starting Positions: Each player rolls a standard die. The highest roller chooses their corner position first(remember for more access to points pick the I position), then the next best is II, then the lowest takes the remaining III position. (Alternatively, draw lots or use any fair random method.)
- Position Assignment for optional order rule otherwise just go in order you rolled the dice:
- The player at Corner I (best path for point access) goes second in turn order.
- The player at Corner II (medium path for point access) goes last in turn order.
- The player at Corner III (worst path for point access) goes first in turn order.
- Colour Assignment: Each player chooses or is assigned a distinct colour set. In standard sets, the three colours are:
- Black (dark tiles with white lines)
- White (light tiles with dark lines)
- Grey (mid-tone tiles with contrasting lines) -- included in the Tri-Board expansion
- Tile Preparation: Each player takes their 18 tiles (see 4.3.4 for distribution) and places them in their opaque bag. Draw 3 tiles to form your starting hand.
- Hand Maintenance: As in standard modes, after each placement, draw a replacement tile so you always maintain 3 tiles in hand.
4.3.4 Tile Distribution
With three players, the standard 22-tile set is reduced to 18 tiles per player to account for the smaller number of tiles each player will place in a typical game. The distribution is rebalanced to emphasise versatility and reduce redundant copies:
| Tile Type | Points | Copies per Player | Total in Game |
|---|---|---|---|
| Star-6 | 5 | 1 | 3 |
| X-Cross | 4 | 1 | 3 |
| Spread | 4 | 1 | 3 |
| Arrow | 3 | 1 | 3 |
| Y-Right | 3 | 1 | 3 |
| Y-Left | 3 | 1 | 3 |
| Tri-Branch | 3 | 2 | 6 |
| Straight | 2 | 2 | 6 |
| Angle | 2 | 2 | 6 |
| L-Curve | 2 | 2 | 6 |
| Block | 1 | 2 | 6 |
| Wildcard | Variable | 1 | 3 |
| TOTAL | -- | 18 | 54 |
The Wildcard Tile:
Each player receives 1 Wildcard tile in Tri-Board Mode. When placed, the Wildcard may be declared as any of the other 10 standard tile types. The choice is made at placement and cannot be changed. The Wildcard counts as the declared type for all purposes (scoring, connections, blocking). Its point value equals the declared type's point value.
Why This Distribution?
- Only 1 copy of the most powerful tiles (Star-6, X-Cross, Spread) increases their value and forces harder decisions.
- 2 copies of versatile but lower-point tiles (Tri-Branch, Straight, Angle, L-Curve) ensure players can build flexible paths.
- 2 Block tiles provide sufficient blocking power in a 3-player environment.
- The Wildcard adds a unique "secret weapon" to each player's arsenal.
4.3.5 Turn Order (+Optional Rule)
Turn order in Tri-Board Mode optional ruleUses the folowing order because it gives the points are more accessible for position I then II then III, so its a sorta balancer:
Order: Player III → Player I → Player II → repeat
This means:
- The player with the worst path for points (Corner III) goes first
- The player with the 2nd worst path for points (Corner II) goes second
After a player wins, the game ends immediately. There is no "finish the round" rule in Tri-Board Mode -- the first to reach a centre hex(one of the 3) wins.
4.3.6 The Center Goal
The Centre Cluster consists of 3 adjacent hexes at the geometric centre of the Triangle Board. These three hexes are the shared goal for all three players.
Winning Condition:
The first player to create a continuous, connected path from their starting corner to any one of the 3 centre hexes wins immediately.
Connection Requirement:
The path must connect to a final tile placed in one of the centre 3 hexes (standard connection rules apply).
Simultaneous Connection (Tie-Breaking):
In the rare case that two players connect to the same centre hex on the same turn (through an X-Cross or Star-6 placement by a third player), resolve the tie as follows:
- Compare the total point value of all tiles in each player's path to that centre hex.
- The player with the higher total tile point value wins the tie.
- If still tied, compare the number of dot hexes touched along each path.
- If still tied, the player who went earlier in turn order wins.
Note: Two players can each connect to different centre hexes simultaneously. In this case, both have won -- the tie-breaker above determines the outright winner for scoring purposes. In casual play, this is considered a shared victory.
4.3.7 Blocking & Shared Center
Blocking Rules (3-Player):
- A player may place a Block tile on any empty hex adjacent to at least one existing tile.
- Blocks do not need to be adjacent to your own path -- you can block anywhere on the board.
- This freedom makes blocking a powerful diplomatic tool: you can block one opponent to indirectly help another.
Shared Centre Hexes:
- The 3 centre hexes are neutral territory. Any player may path into any centre hex.
- Once a centre hex is occupied by a tile, it remains available as a connection point for all players (standard connection rules apply).
- If a centre hex is occupied by a Block tile, no player can connect through it.
Strategic Implications of Shared Centre:
- Rushing the nearest centre hex is tempting, but if another player reaches a different centre hex first, your path may be wasted.
- Placing a Block on a centre hex is the ultimate defensive move, but it costs you a valuable tile.
- If two players are both pathing toward the same centre hex, the race becomes a tense sprint.
4.3.8 Scoring & Dot Hexes
In Tri-Board Mode, dot hexes function differently than in standard modes. They award flat bonus points rather than multipliers:
| Dots on Hex | Bonus Points |
|---|---|
| 2 dots | +2 points |
| 3 dots | +3 points |
| 4 dots | +4 points |
| 5 dots | +5 points |
When Dot Points Apply:
- Dot bonus points are awarded to the winner as part of their victory score.
- Dot bonus points also serve as the primary tiebreaker in draw resolution.
- Unlike Race Mode, dot bonuses are additive flat values, not multipliers.
Scoring Example:
A player wins by reaching a centre hex. Their path passed through one 2-dot hex and one 4-dot hex:
- Base win: 10 points
- Dot bonuses: +3 + +5 = +8 points
- Total: 18 points
4.3.9 2-Player Tri-Board Variant
The Triangle Board can also be used for a 2-player variant with a different feel from the standard 9x9 game.
Setup:
- Players use Corner I and Corner III as their starting positions.
- Corner II becomes a neutral "dead zone" -- no player may place their first tile there, and tiles placed near it may not use it as a transit point.
Goal:
Be the first to reach any one of the 3 centre hexes.
Turn Order:
Player at Corner III goes first (longer path), then alternate.
Tile Distribution:
Each player uses a full 22-tile standard set (11 types x 2 copies).
Blocking:
Standard Race Mode blocking rules apply -- Block tiles must be placed adjacent to existing tiles.
Other Rules:
All standard Race Mode rules apply unless contradicted above. Scoring uses Tri-Board flat dot bonuses.
4.3.10 Draw Resolution
If all 91 hexes are filled and no player has reached a centre hex, resolve the draw as follows:
Step 1 -- Closest to Centre:
For each player, count the number of tiles in their longest connected path toward any centre hex. The player whose path reaches closest (fewest remaining hexes to a centre hex) wins.
Step 2 -- Highest Tile Point Sum:
If tied on proximity, sum the point values of all tiles on each player's longest path. The player with the higher total wins.
Step 3 -- Most Dot Hexes Touched:
If still tied, count the number of dot hexes touched by each player's longest path. The player with more dot hexes touched wins.
Step 4 -- True Draw:
If all criteria are tied, the game is a three-way draw.
Note: Draws on the Tri-Board are exceedingly rare due to the board's size. In practice, someone almost always reaches the centre first.
4.3.11 Tri-Board Strategy
Understanding Corner Advantage:Corner Advantage is only for point aquisition each starting position has 8 hexes to the center
- Position I (goes second): A good strategy is focus on efficiency -- build the shortest possible route to your nearest centre hex. Don't waste tiles on blocking unless directly threatened.
- Position II (goes last): Another good strategy is to watch both opponents and be ready to pivot your path toward whichever centre hex is least contested.
- Position III (goes first):Use your first-move privilege to claim prime real estate in the centre. Place a versatile tile (Star-6 or X-Cross) early to create options.
Centre-Rush vs. Flanking:
- Centre-Rush: Build directly toward the nearest centre hex as fast as possible. Best for Position I. Risk: you may be blocked by a coalition of both opponents.
- Flanking: Build toward a centre hex that is farther from your corner but also farther from your opponents' corners. Best for Positions II and III. Risk: the longer route gives opponents more time to reach other centre hexes.
Blocking in 3-Player:
- In a 3-player game, every block helps one opponent while hurting another. Be aware of whom you are helping.
- A well-timed Block on a centre hex can turn a likely loss into a fighting chance -- but it costs you a turn and a tile.
- Block the leader, not the trailing player. If Player I is about to win, Players II and III should both block I's path -- their rivalry can wait.
The Wildcard:
- Your 1 Wildcard tile is your ace. Save it for a critical moment: either to complete your winning path when no other tile will do, or to place a surprise Block/Star-6 that your opponents didn't anticipate.
- The Wildcard's value increases dramatically as the board fills. In the early game, it is merely convenient. In the late game, it can be the difference between winning and losing.
Reading the Table:
- Watch where your opponents draw tiles from. In Tri-Board, tile bags are separate, but hand sizes are visible.
- If an opponent has been hoarding their Star-6 and X-Cross, they are planning a bold central push.
- If an opponent uses both Block tiles early, they are playing defensively -- take advantage by racing.
Designer Insight: "Tri-Board HEXFLOW teaches you that the best move is rarely the one that helps you the most -- it's the move that helps you the most while helping your opponents the least. Every placement is a political statement."
5. Scoring System
5.1 Scoring Dots (Main Board)
The 9x9 main board features scoring dots engraved on specific hexes. These dots create a risk-reward tension: routing your path through dot hexes multiplies your score but may force you into suboptimal paths.
How Scoring Dots Work:
- Dot hexes are marked with groups of 2, 3, 4, or 5 small engraved dots in the centre of the hex.
- When a winning path passes through a dot hex, the dot multiplier for that hex is applied.
- Base win score: 10 points.
- Multiplier stacking (additive): If a path passes through multiple dot hexes, their multipliers stack additively and are applied to the base score.
Dot Hex Multipliers (Main Board):
| Dots on Hex | Multiplier | Effective Score (single hex) |
|---|---|---|
| 2 dots | ×3 | 10 × 3 = 30 points |
| 3 dots | ×4 | 10 × 4 = 40 points |
| 4 dots | ×5 | 10 × 5 = 50 points |
| 5 dots | ×6 | 10 × 6 = 60 points |
Example Calculations:
- Path through one 2-dot hex: 10 × 3 = 30 points
- Path through one 3-dot hex and one 2-dot hex: 10 × (4 + 3) = 70 points
- Path through one 5-dot, one 4-dot, and one 2-dot hex: 10 × (6 + 5 + 3) = 140 points
Dot Hex Placement:
Dot hexes are placed symmetrically on the board to ensure neither player has an inherent advantage. High-value dot hexes (4 and 5 dots) are typically placed in the central region, forcing players to contest the board's most hotly disputed territory.
5.2 Scoring Dots (Tri-Board)
In Tri-Board Mode, scoring dots function as flat bonus points rather than multipliers. This reflects the faster, more tactical nature of 3-player play.
Dot Hex Bonuses (Tri-Board):
| Dots on Hex | Bonus Points |
|---|---|
| 2 dots | +3 points |
| 3 dots | +4 points |
| 4 dots | +5 points |
| 5 dots | +6 points |
Base win score (Tri-Board): 10 points.
Bonuses are additive. A path through one 2-dot and one 4-dot hex scores: 10 + 3 + 5 = 18 points.
5.3 Tournament Scoring
In tournament HEXFLOW, match results are recorded using the following system:
Match Points:
- Win by path completion: 3 match points
- Win by stalemate/draw resolution: 2 match points
- Draw: 1 match point each
- Loss: 0 match points
Score Differential:
The point margin between the winner's score and the loser's score (or 0-0 in a draw) is recorded as a tiebreaker for standings.
Tile Point Tiebreaker:
In tournament brackets where players have equal match points, the tie is broken by:
- Total score accumulated across all matches (higher is better)
- Sum of tile point values on winning paths (higher is better)
- Number of captures in Battle Mode matches (higher is better)
- Head-to-head result
6. Strategy Guide
6.1 Opening Principles
The opening in HEXFLOW is critical -- your first 3--5 placements establish the backbone of your path and signal your intentions to your opponent.
In Race Mode, the centre of the board is the most valuable real estate. The first player to place a Star-6 or X-Cross in the central region gains a massive routing advantage. In Battle Mode, secure your territory with efficient lines before pushing into the Contested Zone.
If you place three Straight tiles in a row, your opponent knows exactly where you are going and will block you. Mix tile types in your opening to create ambiguity. An Angle tile followed by a Tri-Branch creates two possible route continuations.
You have two starting corners. You are not committed to either until deep into the mid-game. Build a few tiles from both corners early, then commit to the one with better prospects.
You have 22 tiles. You will not use all of them in most games. Every tile you waste on a dead branch is a tile you don't have for the endgame. Don't over-commit to branch threats unless you have the tiles to follow through.
Opening Trap to Avoid: Placing your second tile adjacent to your first but at a rotation that doesn't actually connect. This "fake connection" looks like a path but carries nothing -- and your opponent will punish it with a Block.
6.2 Mid-Game Tactics
The mid-game begins when both players have established their primary path vectors and the board's central region becomes contested.
Arrow, Spread, and Tri-Branch tiles create branch threats -- situations where your path could continue in two or more directions. Your opponent must defend all branches, but you only need one to succeed. Force your opponent to spend their Block tiles defending while you save yours for the endgame.
Place a Block tile not on your opponent's main path, but on a hex they might want for a future branch. This "pre-emptive block" is often more devastating than blocking the current path, because it eliminates options.
In Battle Mode, displacing an opponent's key branch tile (Arrow, Spread, or Y-Right/Left) destroys multiple path options simultaneously. Even in Race Mode, placing a tile on a hex your opponent clearly wanted is a form of denial.
If your opponent has built an efficient route through their territory, and you can connect to it from the centre, your path can "hijack" their infrastructure. This is especially powerful in Race Mode, where opponent tile usage is unrestricted.
Build aggressively toward one destination corner, forcing your opponent to block that approach. Then pivot to the other destination corner using a versatile tile (Star-6, L-Curve, Angle). Works best when your opponent has already spent their Block tiles.
6.3 Endgame Technique
The endgame begins when one or both players are within 3--4 tiles of completing their path.
Before every endgame move, count: "How many tiles do I need to win?" Then count: "How many tiles does my opponent need to win?" If your opponent needs fewer tiles, you must block. If you need fewer, you can push for the win.
Always keep at least one highly versatile tile (Star-6, Tri-Branch, or X-Cross) for your final approach. Nothing is worse than having a clear path to victory and no tile that can actually complete the connection.
Before placing any tile in the endgame, mentally rotate it through all 6 orientations. The winning orientation is often non-obvious. The Star-6 has only one unique orientation, but an Angle tile has three distinct effective orientations.
If your opponent is one tile away from winning, you have no choice -- you must block. The best block is one that both stops the opponent's path and advances your own. If no such block exists, play the block that forces your opponent to take the longest possible detour.
In tournament play, routing your final approach through high-dot hexes can multiply your score significantly. A path through a 5-dot hex is worth 6× the base -- sometimes worth a one-turn detour.
6.4 Tile-Specific Advice
| Tile | Best Used For | Avoid Using For |
|---|---|---|
| Straight (2) | Efficient backbone of your path; filling long corridors | Tight corners; anywhere you need flexibility |
| X-Cross (4) | Navigating the centre; creating crossing paths where multiple routes converge | Simple straight runs (wasteful) |
| Angle (2) | Tight pivots near corners; redirecting opponent paths | Long-distance routing (too many turns) |
| Arrow (3) | Branch threats; creating two-route dilemmas for opponents | Dead-end positions (one branch will be wasted) |
| Block (1) | Endgame denial; filling key hexes before opponent can use them | Early game (usually better to build your own path) |
| Y-Right/Left (3) | Building from corners; creating paths that hug the board edge | Centre play (the branch is less useful in open space) |
| Star-6 (5) | Emergency get-out-of-jail; final approach when orientation is unclear | Blocking (wasteful -- use a Block tile instead) |
| Tri-Branch (3) | Final approach to the goal; creating maximum connection options | Simple paths where a Straight would suffice |
| L-Curve (2) | Redirecting opponent paths; tight pivots in crowded areas | Long straight runs |
| Spread (4) | Board centre control; maximum branch threat from a single hex | Near board edges (one or two branches point off-board) |
7. Variants & House Rules
7.1 Wildcard Block
In this variant, Block tiles become wild tiles with a twist:
- When you place a Block tile, you may declare it to have one single line of your choice (connecting any two flat-side midpoints).
- The line is chosen at placement and cannot be changed.
- The tile is treated as having the declared line for all purposes (connections, path validity, etc.).
- For scoring purposes, a "wildblocked" tile counts as a 2-point tile (not 1 point).
Impact: This variant dramatically increases the value of Block tiles. They become versatile "joker" tiles that can fill gaps, extend paths, and still serve as blockers if placed without declaring a line. Games tend to be slightly longer and more tactical.
Recommended for: Players who find the standard Block tile too weak or situational.
7.2 Open Hand
In this variant, both players play with hands visible to each other at all times.
Rules:
- After drawing tiles, all 3 tiles in each player's hand are kept face-up where the opponent can see them.
- Tile bags remain opaque -- future draws are unknown.
- All other rules remain identical.
Impact: This removes bluffing and hidden information, transforming HEXFLOW into a purely tactical game. Every move can be calculated and countered. The advantage shifts to the player with superior positional understanding. Games tend to be tighter and more defensive.
Recommended for: Teaching new players; analytical players who dislike hidden information; players transitioning from chess.
7.3 Timed Turns
For competitive play, impose a time limit per turn:
Standard Timing:
- Each player has 60 seconds to complete their turn (select, orient, and place).
- If time expires, the player must place their currently selected tile at its current rotation on a legal hex of the opponent's choice.
Blitz Timing:
- Each player has 30 seconds per turn.
- If time expires, the player skips their turn (no placement).
Tournament Timing:
See Section 8 for full tournament clock rules.
Recommended for: Experienced players; tournament warm-ups; adding tension to casual games.
7.4 Team Hexflow (2v2 Partnership)
A partnership variant for four players on an 11x11 board (109 hexes).
Setup:
- Players form two teams of two. Partners sit opposite each other.
- The board is expanded to 11x11 hexes to accommodate four players.
- Team A: Both players use black tiles. Player A1 starts from the bottom-left corner; Player A2 starts from the top-right corner.
- Team B: Both players use white tiles. Player B1 starts from the top-left corner; Player B2 starts from the bottom-right corner.
Rules:
- Partners share a common path. Tiles placed by either partner contribute to the team's path.
- Turns alternate around the table: A1 → B1 → A2 → B2 → repeat.
- Partners may discuss strategy freely on their team's turns but may not touch each other's tiles.
- Either partner completing a path to the opponent's corner wins for the whole team.
- No displacement in Team Hexflow -- use standard Race Mode rules.
Tile Distribution:
Each player receives a 16-tile reduced set (8 types x 2 copies), excluding Star-6, X-Cross, Spread, and Arrow from individual sets. These "power tiles" are placed in a shared pool of 8 tiles that either partner can draw from once per game.
Winning:
First team to complete a continuous path from any of their starting corners to any opponent's corner wins.
Recommended for: Game nights; couples; players who enjoy partnership games like Bridge or Team Chess.
8. Tournament Rules
8.1 Match Format
Bracket Structure:
- The current working HEXFLOW tournaments structure uses a single-elimination or double-elimination bracket.
- Each match is a best-of-3 games.
- The player who goes first alternates: Player A starts Game 1, Player B starts Game 2, and the higher seed starts Game 3 if necessary.
Match Scoring:
- Win by path: 3 match points
- Win by stalemate: 2 match points
- Draw: 1 match point each
- Loss: 0 match points
8.2 Time Control
Standard Clock:
- Each player receives 15 minutes on their clock.
- Additionally, each player receives a 30-second increment per move (Fischer timing).
- Clocks are paused during rule disputes.
Time Forfeit:
- If a player's main clock expires, they lose the game immediately, regardless of board position.
- The 30-second increment is added after the move is completed.
8.3 Illegal Placement
First Offence:
- The placement is retracted.
- The offending player receives a verbal warning.
- The player must make a legal placement instead.
- 30 seconds are deducted from their clock as a penalty.
Second Offence:
- The offending player loses their turn.
- The illegally placed tile (if any) is returned to their hand.
- Their clock continues to run for the duration of their missed turn.
Third Offence:
- The offending player forfeits the game.
What Constitutes an Illegal Placement:
- Placing a tile on a non-empty hex.
- Placing a tile not adjacent to any existing tile (after the first turn).
- Placing a tile with no connecting line to an adjacent tile.
- Attempting to displace without a valid displacement token.
- Attempting to displace a starting corner tile.
- Placing a tile from an empty hand.
- Rotating a tile after it has been placed.
8.4 Dispute Resolution
Minor Disputes (connection validity, transit compliance, path existence):
- The players may rewind to the disputed position by mutual agreement.
- A tournament judge may be called to rule on the validity of a claimed path.
- If photographic evidence is available (from a spectator or overhead camera), it takes precedence.
Major Disputes (illegal placement, displacement legality):
- A tournament judge must be called immediately.
- The judge's ruling is final.
- If the dispute cannot be resolved, the game is annulled and replayed with reversed colours.
8.5 Sportsmanship
- The touch-move rule is in effect: once a tile touches the board, it must be placed (though the hex and rotation may be adjusted before the finger leaves the tile).
- Players should announce "path" or "connect" when they believe they have completed a winning path.
- Players should announce "displace" before performing a displacement in Battle Mode.
- Intentionally distracting an opponent or interfering with their clock is grounds for disqualification.
8.6 Tournament Checklist
Before each match, verify:
9. FAQ & Edge Cases
General Questions
A: Yes. Placement requires only that your tile be adjacent to an existing tile and share at least one line connection with any tile on the board -- yours or your opponent's. You may place tiles that advance your opponent's position if the lines happen to connect. This is sometimes a necessary sacrifice to gain board position.
A: In Race Mode, yes -- absolutely. If the line endpoints connect at the shared flat-edge midpoint, the path may traverse opponent tiles freely. In Battle Mode, you may use opponent tiles only if they are in the Contested Zone or on tiles you placed yourself. You may never use opponent-placed tiles in their own territory in Battle Mode.
A: The Block tile contains a self-contained inner hexagon with no line endpoints at any flat side. It has zero liberties and cannot carry any path segment for either player. It is a pure blocking piece. In the Wildcard Block variant, it can be treated as having a single line of your choice. In Battle Mode, it can be used to displace adjacent opponent tiles.
A: Yes. Exactly one tile per turn is mandatory. Passing or skipping is never permitted. If you have no legal placement (extremely rare), you forfeit the game.
A: No. Once your finger leaves the tile, the placement and orientation are final. This is the "touch-move" rule. Take your time selecting orientation before committing.
A: In casual play, retract and place legally. In tournament play, this counts as an illegal placement and is penalised according to tournament rules (see Section 8.3).
Connection & Path Questions
A: A path may loop back through previously visited tiles, but for winning purposes, only a continuous non-self-intersecting route is evaluated. Loops do not provide any advantage.
A: The active player (the one who just placed the tile) wins. If their path is invalid in Battle Mode due to the Transit Rule, the opponent wins instead.
A: The path must connect to a tile placed on the opponent's starting corner hex, or to a tile connected through that corner hex. The corner hex itself is a valid endpoint.
A: No. The Block tile has no line exits and cannot carry any path segment in standard play. Even in the Wildcard Block variant, the declared line must connect to another tile's line to contribute to a path.
A: That is perfectly fine. A line endpoint at an unshared edge simply points to nothing. It has no effect unless and until a tile is placed in the adjacent hex with a matching line endpoint.
Battle Mode Specific Questions
A: No. A tile must have been on the board for at least one full turn cycle before it can be displaced. This prevents immediate "ping-pong" displacement battles.
A: No. A displacement is illegal if it would leave any tile on the board with no adjacent connections. The board must remain a single connected graph after displacement.
A: No. Starting corner hexes are protected and may never be displaced.
A: Yes. Any displaced tile goes to the displacing player's capture pile, worth 2 points in stalemate scoring.
A: Yes. The Contested Zone is neutral territory -- any line on any tile may be used by any player.
A: Trace every tile in your claimed path. If any tile in the opponent's territory along that route was placed by them, the path is transit-invalid. Tiles in the Contested Zone or placed by you are always valid.
Tri-Board Mode Specific Questions
A: Yes. You may place a Block tile on any centre hex, preventing any player from connecting through it. This is a powerful defensive move.
A: The game continues until all hexes are filled, then resolves by draw rules (see Section 4.3.10). This situation is extremely rare.
A: Yes. The Wildcard can be declared as any of the 10 standard tile types, including a Block.
A: Tiles may be placed near Corner II following normal adjacency rules. However, Corner II itself cannot be used as a starting position or path endpoint. Think of it as a normal space with no corner label.
A: In casual play, yes -- it is considered a shared victory. In tournament play, use the tile-point tiebreaker to determine the winner for scoring purposes.
Scoring Questions
A: No. Dot hexes are only for scoring in tournament or extended play. A win is a win regardless of score. Dot hexes exist only to differentiate close matches and reward ambitious routing.
A: No. Each dot hex's multiplier is applied at most once, even if your path passes through it multiple times via looping.
A: No. Captured tiles only contribute to the stalemate score if the game ends without a path winner. They do not affect the winning path's score.
Setup & Component Questions
A: A replacement tile can be proxied with a slip of paper noting its type. For tournament play, borrowed replacement sets should be requested from the tournament organiser.
A: No. Your bag is opaque. You draw randomly and must play with the tiles you draw.
A: Yes. You may count your remaining tiles at any time. You may also count your opponent's remaining tiles (by requesting they display their bag's contents).
10. Glossary
| Term | Definition |
|---|---|
| Angle | A tile type (2 points) connecting T to TR; a short 60-degree bend. |
| Arrow | A tile type (3 points) with lines from T to TR and TL; splits upward like an arrowhead. |
| Battle Mode | A 2-player game mode with left-vs-right starting positions, the Transit Rule, and tile displacement. |
| Block | A tile type (1 point) with no line exits; a pure blocker with zero liberties. |
| Blocking | The strategic placement of tiles to interfere with or redirect an opponent's path. |
| Branch | A point in a path where a tile has multiple outgoing connections, creating multiple route options. |
| Branch Threat | A situation where a player's tile creates two or more viable path continuations, forcing the opponent to defend multiple routes. |
| Capture | In Battle Mode, removing an opponent's tile via displacement and adding it to your capture pile. Worth 2 stalemate points. |
| Capture Pile | The face-up collection of tiles a player has captured through displacement in Battle Mode. |
| Centre Cluster | The 3 adjacent hexes at the centre of the Triangle Board; the shared goal in Tri-Board Mode. |
| Centre Hex | Any of the 3 hexes in the Centre Cluster on the Triangle Board. |
| Connection | The state of two adjacent tiles sharing line endpoints at their shared flat-edge midpoint. |
| Contested Zone | In Battle Mode, columns 4-6 of the board; neutral territory where any player may use any line. |
| Corner | One of the labelled starting positions on the board (A, B, I, II, or III). |
| Displacement | In Battle Mode, removing an adjacent opponent tile (with a Block or Star-6) and replacing it with your own. Limited to 3 per player per game. |
| Displacement Token | A marker tracking remaining displacement uses. Each player begins with 3. |
| Dot Hex | A board hex engraved with scoring dots (2, 3, 4, or 5) that act as score multipliers (Main Board) or flat bonuses (Tri-Board). |
| Edge Midpoint | The precise centre point of a hex's flat side. All tile line endpoints are located here. |
| Enemy Territory | In Battle Mode, the third of the board closest to the opponent's starting side. Opponent-placed tiles here cannot be used for your path. |
| First Placement | A player's initial tile of the game, which must be placed on one of their starting corners. |
| Flat Side | Any of the six straight edges of a hexagonal tile or board space. |
| Hand | The 3 tiles a player holds and selects from on their turn. |
| Hijacking | Using an opponent's connected tiles as part of your own path (fully allowed in Race Mode; restricted in Battle Mode). |
| Illegal Placement | A tile placement that violates one or more placement rules. Penalised in tournament play. |
| L-Curve | A tile type (2 points) connecting T to BR; a 120-degree angle. |
| Liberty | Adapted from Go: a tile's potential connection points (line endpoints at flat-side midpoints). |
| Line | An engraved path on a tile running from one flat-side midpoint to another. |
| Line Endpoint | The point where a tile's line meets the midpoint of a flat side. |
| Orientation | The rotational position of a tile, measured in multiples of 60 degrees (0, 60, 120, 180, 240, 300). |
| Orphan Tile | A tile placed with no adjacent connections; illegal under standard placement rules. |
| Path | A continuous sequence of connected tiles forming an unbroken route between two points on the board. |
| Point Value | The numerical value assigned to each tile type, indicating its versatility and power. |
| Race Mode | The standard 2-player game mode with diagonal corner starts; a pure race to connect. |
| Rotation | Turning a tile to a different orientation before placement. Six possible orientations exist. |
| Scoring Dots | Engraved dot groups on specific board hexes that multiply or add to the winning score. |
| Side | One of the six flat edges of a hex, named T, TR, BR, B, BL, TL. |
| Spread | A tile type (4 points) with lines from T to B, BR, and BL; resembles a peace sign. |
| Stalemate Score | In Battle Mode, the point total used to resolve games with no path winner (path length + captures + dot multipliers). |
| Star-6 | A tile type (5 points) with lines connecting all six sides; the most versatile tile. |
| Starting Corner | A corner hex designated as a player's starting position at game setup. |
| Straight | A tile type (2 points) connecting T to B; a direct vertical pass-through. |
| T | Abbreviation for the Top side of a hex tile. |
| Tile Type | One of the 11 (or 12) distinct line patterns available in the game. |
| Touch-Move | The rule that once a tile is placed (finger leaves the tile), the placement is final. |
| Transit Rule | The Battle Mode restriction preventing players from using opponent-placed tiles in enemy territory for path transit. |
| Transit-Valid | A path segment that complies with the Transit Rule (passing through own tiles or Contested Zone tiles). |
| Transit-Invalid | A path segment that violates the Transit Rule (passing through opponent-placed tiles in their territory). |
| Tri-Board | The triangular board used for 3-player games. |
| Tri-Board Mode | The 3-player game mode played on the Triangle Board with a centre-goal objective. |
| Tri-Branch | A tile type (3 points) with lines from B to TR and TL; a Y-shape from bottom to upper sides. |
| Wildcard | In Tri-Board Mode, a special tile that can be declared as any standard tile type upon placement. |
| Wildcard Block | A variant rule allowing Block tiles to be played with one declared line of the player's choice. |
| Winning Path | A continuous, valid path from a player's starting corner to an opponent's corner (or centre hex in Tri-Board). |
| X-Cross | A tile type (4 points) with crossing lines T-B and TR-BL; two independent pass-throughs. |
| Y-Left | A tile type (3 points) with lines T-B and BL; a straight with a branch to bottom-left. |
| Y-Right | A tile type (3 points) with lines T-B and BR; a straight with a branch to bottom-right. |
11. Credits & Designer Notes
About the Designer
B.W.Evans is a tabletop game designer, writer, artist and all around gamer. From TTRPG(the oldschool ones D&D 1st and 2nd Adition as well as Cyberpunk 2020 and Rifts) to video games form my Commodore 64 & Amiga days with a passion for tactical and strategy type video games, among others. HEXFLOW represents a culmination of his love for strategy board games like Go and Chess.
Design Philosophy
"I wanted to create a game that felt ancient -- like something carved into stone and played for centuries The hex grid, the engraved lines, the slate-and-stone aesthetic: all of it serves the feeling that HEXFLOW is a game that has always existed, waiting to be rediscovered."
"The Liberty Principle is what makes HEXFLOW sing. Every tile you place is alive with potential connections -- or dead with intentional absence. A Block tile is not merely an obstacle; it is a statement. It says: here, no path shall pass."
"I included three modes because HEXFLOW is really three games in one. Race Mode is a sprint. Battle Mode is a war. Tri-Board Mode is a free-for-all. Each reveals different facets of the same elegant system."
Development History
HEXFLOW emerged from years of experimentation with hex-grid connection mechanics. Early prototypes used corner-to-corner lines, but playtesting revealed that flat-side-to-flat-side routing created a cleaner, more intuitive connection system. The 11 tile types were refined over hundreds of playtests to ensure every tile has a distinct role and no tile is strictly superior to another in all situations.
The scoring dot system was added to create strategic tension in tournament play, rewarding players who seek optimal routes rather than merely functional ones. Battle Mode's Transit Rule and displacement mechanics were developed to add a layer of territorial strategy inspired by classical Go concepts.
Acknowledgements
The designer gratefully acknowledges the playtesters whose feedback shaped HEXFLOW's tile distribution, and scoring systems among other things. Special thanks to the abstract strategy gaming community for their enduring support of games that reward intellect over chance.
Copyright & Reproduction
HEXFLOW © B.W.Evans. Mythic Creations LLC. All rights reserved.
This rulebook may be reproduced for personal, educational, and tournament use. Commercial reproduction requires written permission from the designer.
Contact
For tournament organisation inquiries, variant submissions, and community resources, contact the HEXFLOW design team through your regional distributor or the official HEXFLOW community hub.
Final Word from the Designer:
"Place your first tile with confidence, your second with caution, and your third with cunning. Every game of HEXFLOW tells a story written in lines on stone. Make yours worth engraving."
-- B.W.Evans
Rulebook Version 1.4 -- Complete Edition
Formatted in accordance with professional tabletop game publication standards.