HEXFLOW
Tile Reference Guide
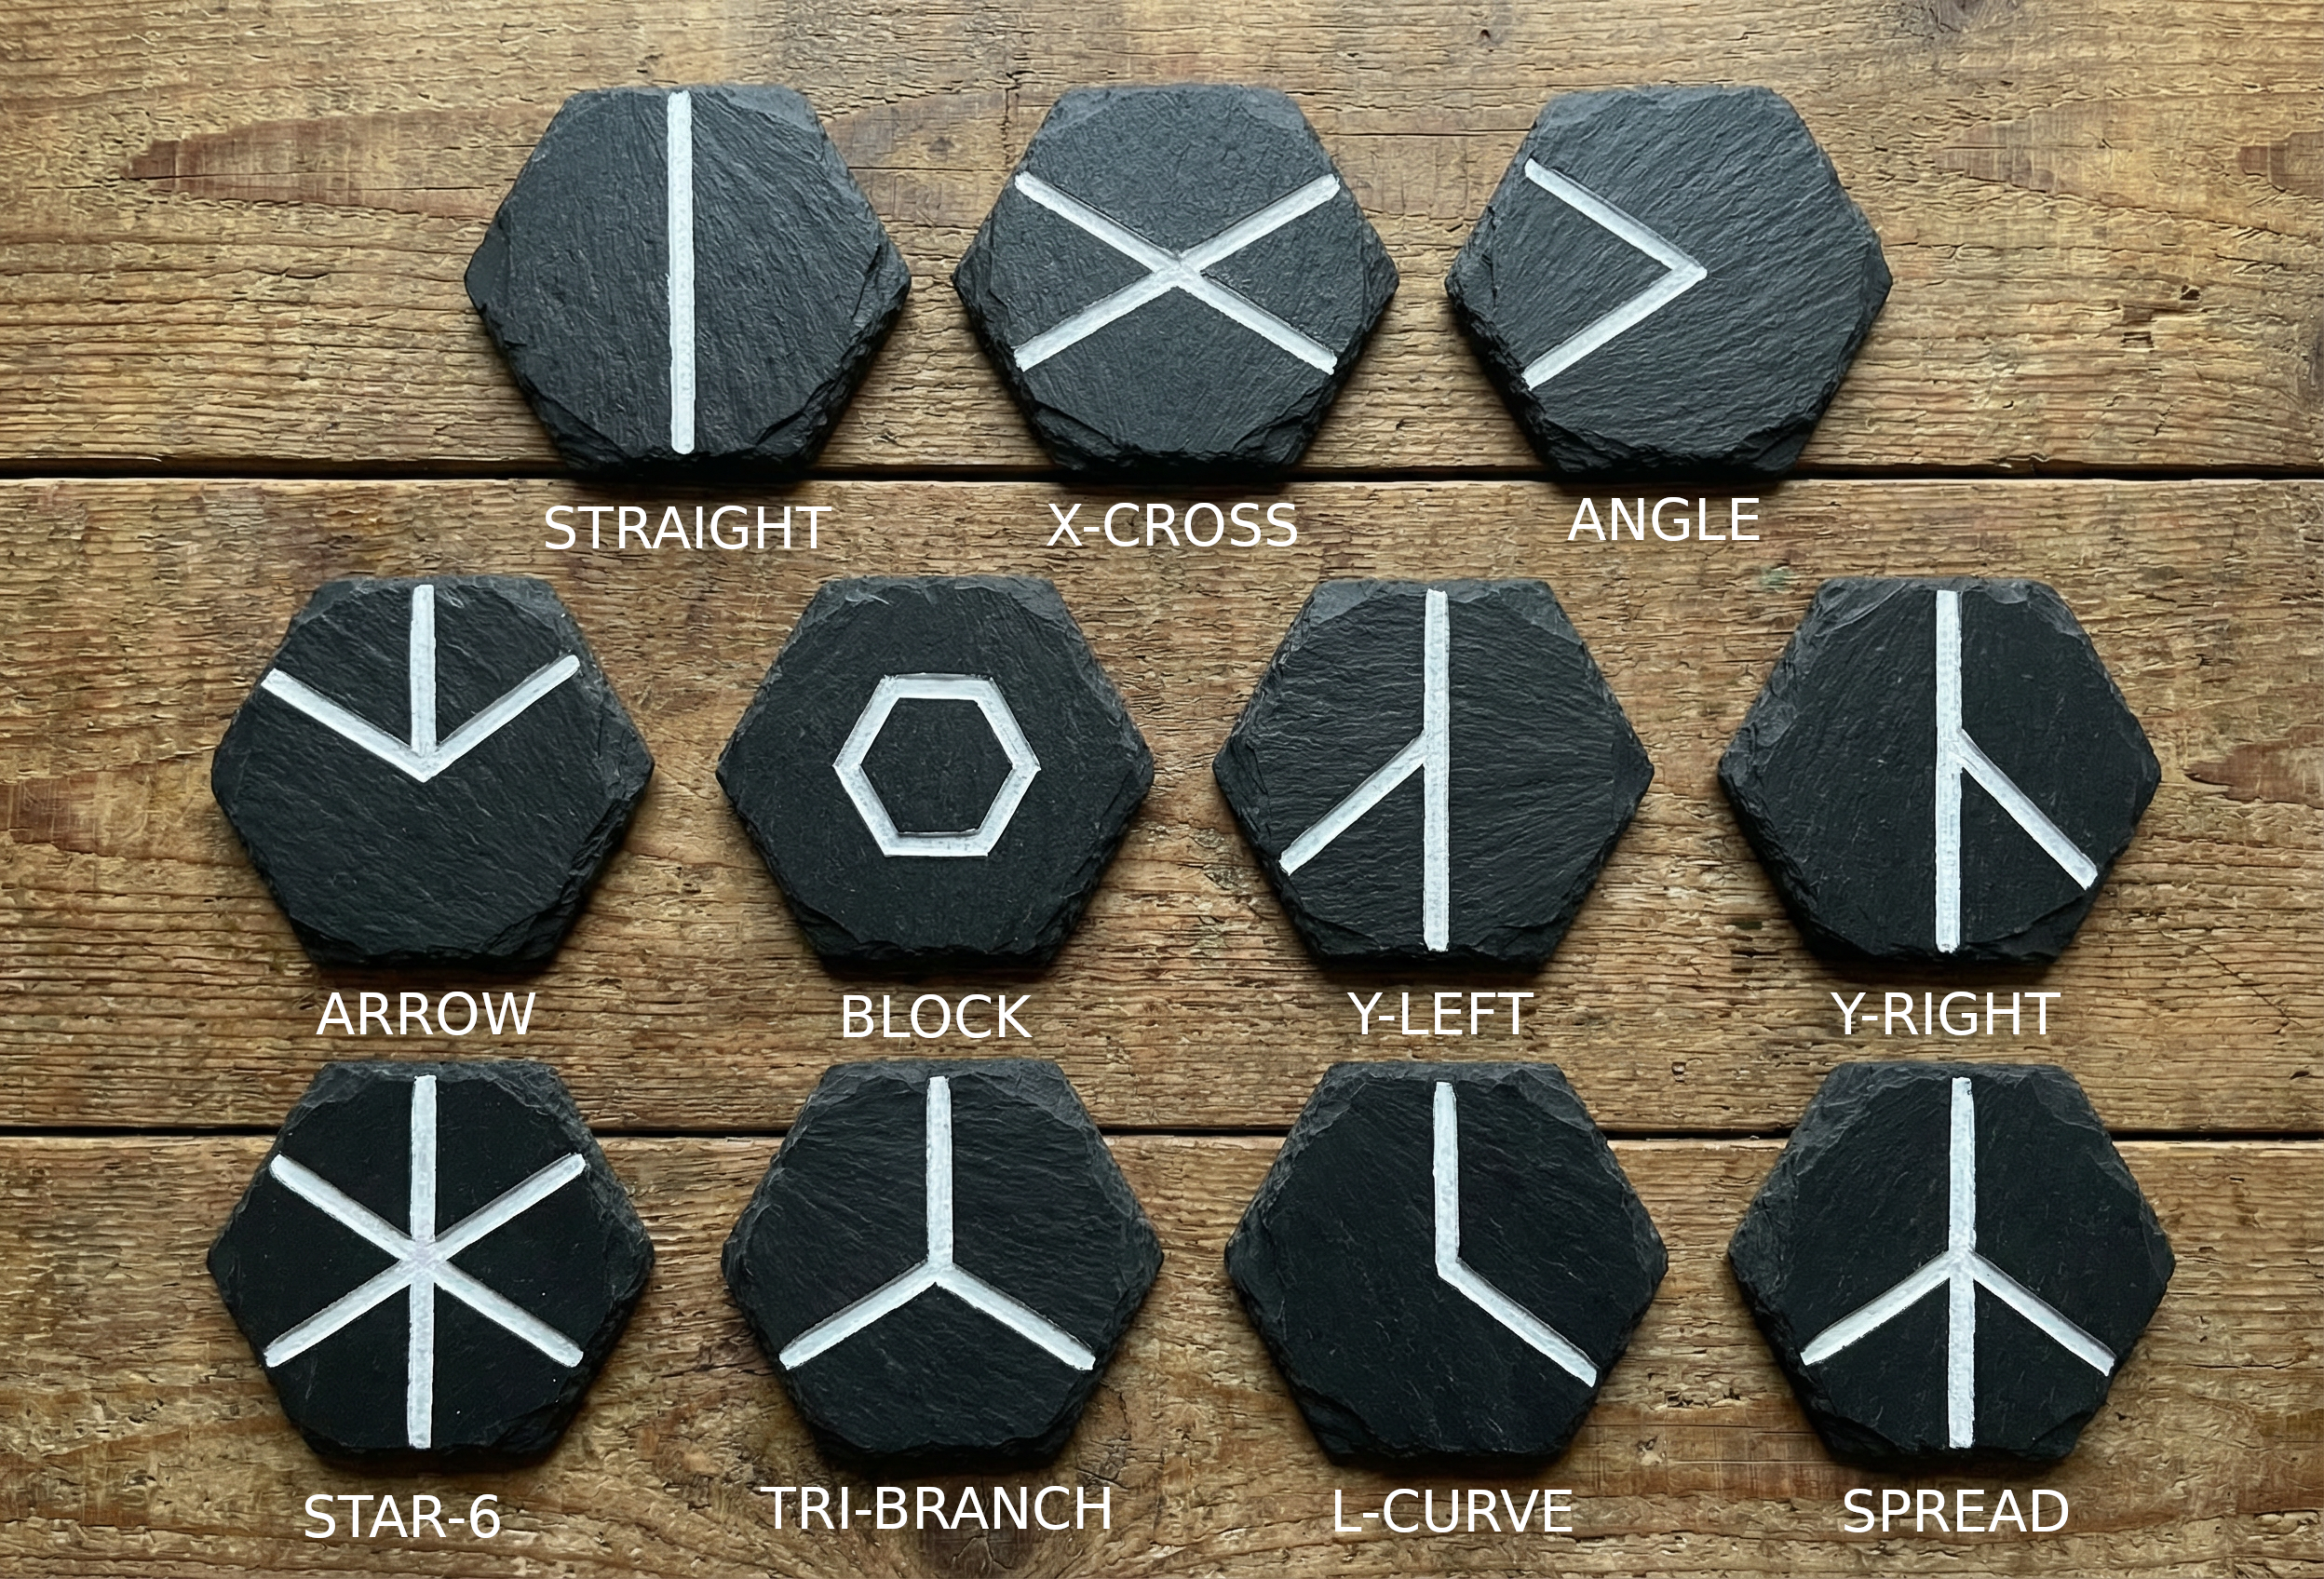
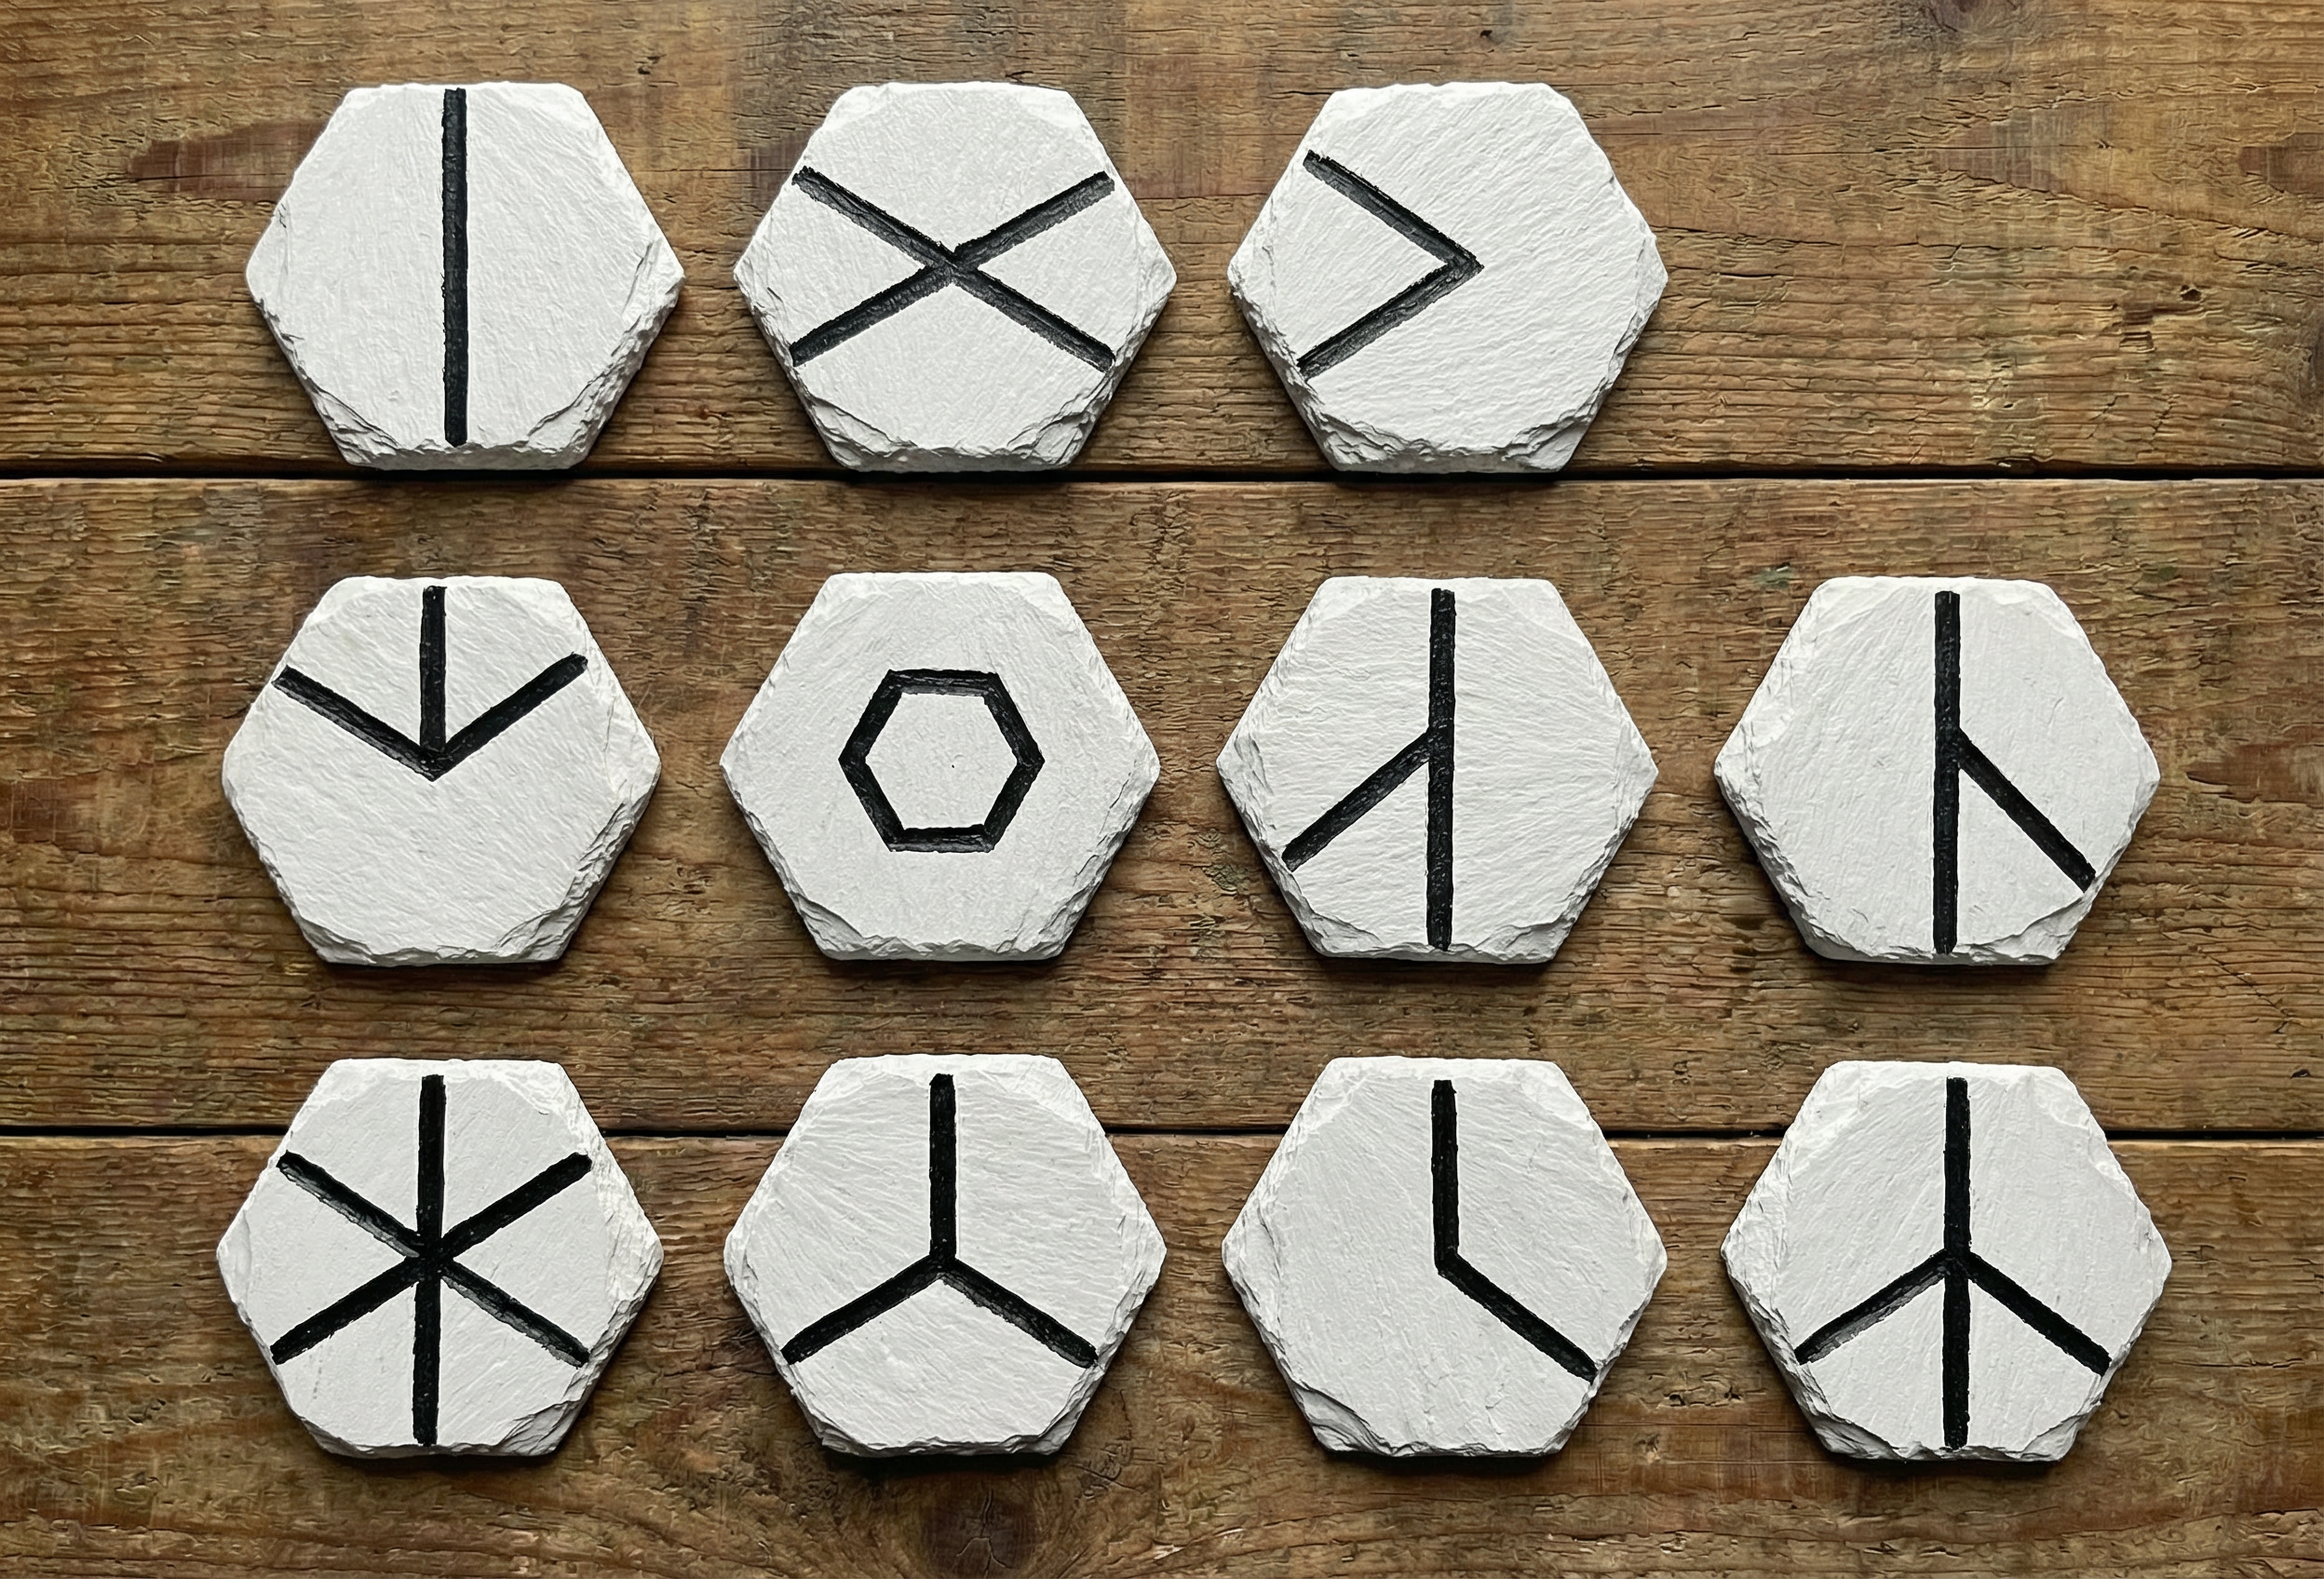
Black Tiles (Player A) White Tiles (Player B)

Left: Black tiles (Player A)  |  Right: White tiles (Player B)
22 tiles per player (2 copies each of 11 types)

Straight 2
T — B
Direct vertical pass-through. The backbone of efficient paths.
Best for: long corridors and straight runs. Avoid tight corners.
X-Cross 4
T-B × TR-BL
Two independent crossing lines. Navigate busy intersections.
Best for: centre control and crossing paths. Overkill for simple runs.
Angle 2
T — TR
Short 60° bend. Quick pivot for tight directional changes.
Best for: corner pivots and redirects. Not for distance.
Arrow 3
T → TR+TL
Splits from top to all three upper sides. Creates branch threats.
Best for: forcing opponents to defend multiple routes.
Block 1
✗ None (inner hexagon)
Pure blocker. Zero liberties. No exits. Dead end for all paths.
Best for: endgame denial on key hexes. Also displaces in Battle Mode!
Y-Right 3
T-B + BR
Straight vertical with a branch to bottom-right.
Best for: building from corners along board edges.
Y-Left 3
T-B + BL
Straight vertical with a branch to bottom-left. Mirror of Y-Right.
Best for: building from corners along board edges.
Star-6 5
All 6 Sides
Three lines through centre. Connects everywhere. Maximum versatility.
Best for: emergency connections and final approaches. Can displace in Battle!
Tri-Branch 3
B → TR+TL
Y-shape from bottom to upper sides. Maximum connection options.
Best for: final approach to the goal. Creates many routing options.
L-Curve 2
T — BR
A 120° Angle. A good redirect in crowded areas.
Best for: tight pivots and redirecting opponent paths.
Spread 4
T → B+BR+BL
Resembles a peace sign / Algiz rune. Maximum downward branching.
Best for: centre control. Avoid edges (branches may point off-board).
Side Abbreviations: T = Top  |  TR = Top-Right  |  BR = Bottom-Right  |  B = Bottom  |  BL = Bottom-Left  |  TL = Top-Left
All lines run from flat-side midpoint to flat-side midpoint — never corner to corner.
Tile Quick Summary
TilePtsType TilePtsType
Straight2Path X-Cross4Crossing
Angle2Bend Arrow3Branch
Block1Blocker Y-Right3Branch
Y-Left3Branch Star-65Universal
Tri-Branch3Branch L-Curve2Bend
Spread4Branch 2 copies each per player
HEXFLOW
Quick Rules & Winning
Objective

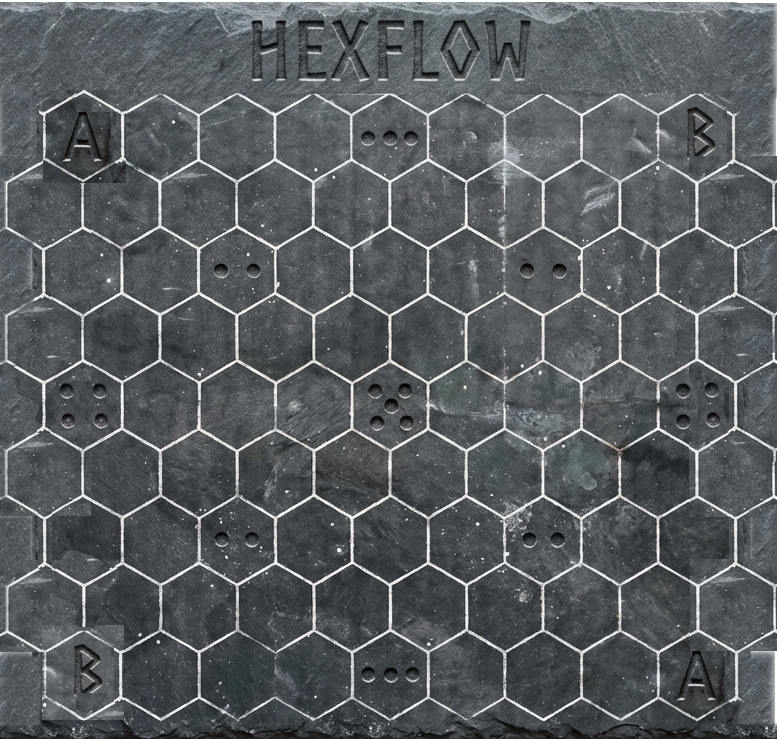
Be the first to build a continuous, connected path from your starting corner to one your opposite corner using engraved hex tiles on the 9×9 board.

Setup
  • Place the 9×9 board between players. Player A owns corners A (bottom-left & top-right). Player B owns corners B (top-left & bottom-right).
  • Each player takes all 22 tiles of their colour and places them in an opaque bag.
  • Each player draws 3 tiles to form a starting hand.
  • After each turn, draw a replacement so you always have 3 tiles in hand.
  • Flip a coin to determine first player. Winner chooses to play first or second.
Turn Structure

On your turn, perform all 3 steps in order:

1 Select & Orient — Choose a tile from your hand. Rotate to any of 6 orientations (0°, 60°, 120°, 180°, 240°, 300°).

2 Choose Position — Place on an empty hex adjacent to at least one existing tile, with at least one line connection. Your first tile must go on one of your starting corner hexes.

3 Place & Check — Set the tile onto the hex. Check for a winning path. If yes, you win immediately. If no, pass the turn.
Key Reminders
  • Touch-move rule: Once your finger leaves the tile, placement is final.
  • No passing: You must place exactly one tile per turn. Skipping is never allowed.
  • Opponent tiles: Your path may travel through opponent tiles if the lines connect.
  • Block immunity: The Block tile cannot carry any path segment for either player.
Placement Rules
  • First placement: Must be on one of your own starting corner hexes.
  • Adjacency: All subsequent tiles must be placed on an empty hex adjacent to at least one existing tile.
  • Connection: At least one line on your tile must connect to a line on an adjacent tile already on the board.Like liberties in Go, No orphans allowed.
  • Rotation: You may rotate to any of 6 orientations before placing. No post-placement rotation.
  • One per hex: No stacking or replacing tiles. Once occupied, a hex stays occupied.
Winning Conditions
✓ Immediate Win: The moment a player places a tile completing a valid continuous path from their starting corners to their opposite corners, that player wins immediately. The game ends at that moment -- no further tiles are played.another Auto win is if a player places a block tile and stops their opponents line and they have no other branches to allow their line to make it to their opposite corner.
✗ Simultaneous Win: If a placement completes paths for both players, the active player (who just placed) wins. In Battle Mode, their path must also be transit-valid.
○ Draw: If all 85 hexes fill with no winner, the player whose longest connected chain reaches furthest toward the opposing corner wins. If equal, it's a draw.
Scoring Dots Reference

Dot hexes multiply the base score of 10 points (tournament play). Multipliers from multiple dot hexes stack additively.

Dots Multiplier Score
●● 2 ×3 30 pts
●●● 3 ×4 40 pts
●●●● 4 ×5 50 pts
●●●●● 5 ×6 60 pts

Example: Path through 2-dot + 3-dot hexes = 10 × (3 + 4) = 70 points

9x9 Main Board

9×9 Main Board — 85 hexes, A/B corners

Connection Rule: Two adjacent tiles connect when both have a line endpoint at the midpoint of their shared flat edge. Corners are never connection points.
HEXFLOW
Battle Mode Reference
A contest of territory and surgical strikes. Players start from opposite sides. The centre of the board becomes a war zone where tile displacement, capture chains, and territorial denial decide the victor.
Setup Differences (vs. Race Mode)
  • Board orientation: Left edge vs. Right edge (not diagonal corners).
  • Player A starts from both left-side corners (top-left & bottom-left).
  • Player B starts from both right-side corners (top-right & bottom-right).
  • Each player takes 3 displacement tokens.
  • Designate a capture pile area for each player.
Territory Diagram
B ○──────────────────────────────────────────────────────── B[A Territory] [ Contested Zone ] [B Territory] │ │ Columns 1-3 Columns 4-6 Columns 7-9 │ │ │ A ○──────────────────────────────────────────────────────── A Player A: left side → right side Player B: right side → left side
The Transit Rule

The defining mechanic of Battle Mode. Governs which tiles your path may use:

✓ Transit-Valid: Your own tiles (anywhere) + Any tile in the Contested Zone (columns 4-6) + Your starting corner hexes.
✗ Transit-Invalid: Opponent-placed tiles located in their Territory (their side of the board). You cannot "ride their rails" through enemy territory!

Transit is checked per-tile, not per-line. Even if the line connects perfectly, you cannot use an opponent-placed tile in their territory.

Winning by Path

First player to complete a valid, transit-compliant path from their starting side to the opponent's side wins immediately.

Transit Compliance Check: Before declaring victory, verify your path does NOT pass through any opponent-placed tiles in their territory.
Tile Combat & Displacement

Only Block and Star-6 tiles can displace adjacent opponent tiles. Max 3 displacements per player per game.

Displacer Effect
Block (1 pt) Displaces any adjacent opponent tile. Creates a dead zone.
Star-6 (5 pts) Displaces any adjacent opponent tile. Creates a superhighway.
Displacement Conditions
  • Placing a Block or Star-6 from your hand
  • Placement hex is adjacent to at least one opponent tile
  • You have at least one displacement token remaining
  • Target is not on a starting corner hex
  • Displacement would not orphan any tiles on the board
Displacement Procedure
  1. Announce intent to displace
  2. Select one adjacent opponent tile as target
  3. Remove target tile → place in your capture pile
  4. Place your Block or Star-6 on the now-empty hex
  5. Discard one displacement token
  6. Check for a winning path
Capture Scoring
Per Capture 2 pts
Max Displacements 3 each

Captured tiles go face-up in your capture pile (visible to both players). Capture points apply to stalemate resolution and tournament tiebreakers.

Stalemate Resolution

If all 85 hexes fill with no path winner, calculate Stalemate Score:

Criterion Points
Longest transit-valid path toward goal (per tile) 1 pt each
Captured tiles 2 pts each
Dot hexes on longest path ×3 / ×4 / ×5 / ×6

Highest Stalemate Score wins. If tied, the game is a draw.

Example: Path = 12 tiles + 4 captures (8 pts) + one 2-dot hex
Score: 12 + 8 + (12 × 3) = 56 points
Simultaneous Completion

If a placement completes paths for both players, the active player wins. However, if their path is transit-invalid, it does not count — and the opponent wins instead.

HEXFLOW
Tri-Board (3-Player) Reference
A chaotic three-way race for the centre. Each player's goal is to create a path from their corner to any one of the 3 centre hexes. Alliances form and dissolve in a single turn.
The Tri-Board
Hexes per side 14
Total hexes 91
Centre hexes 3
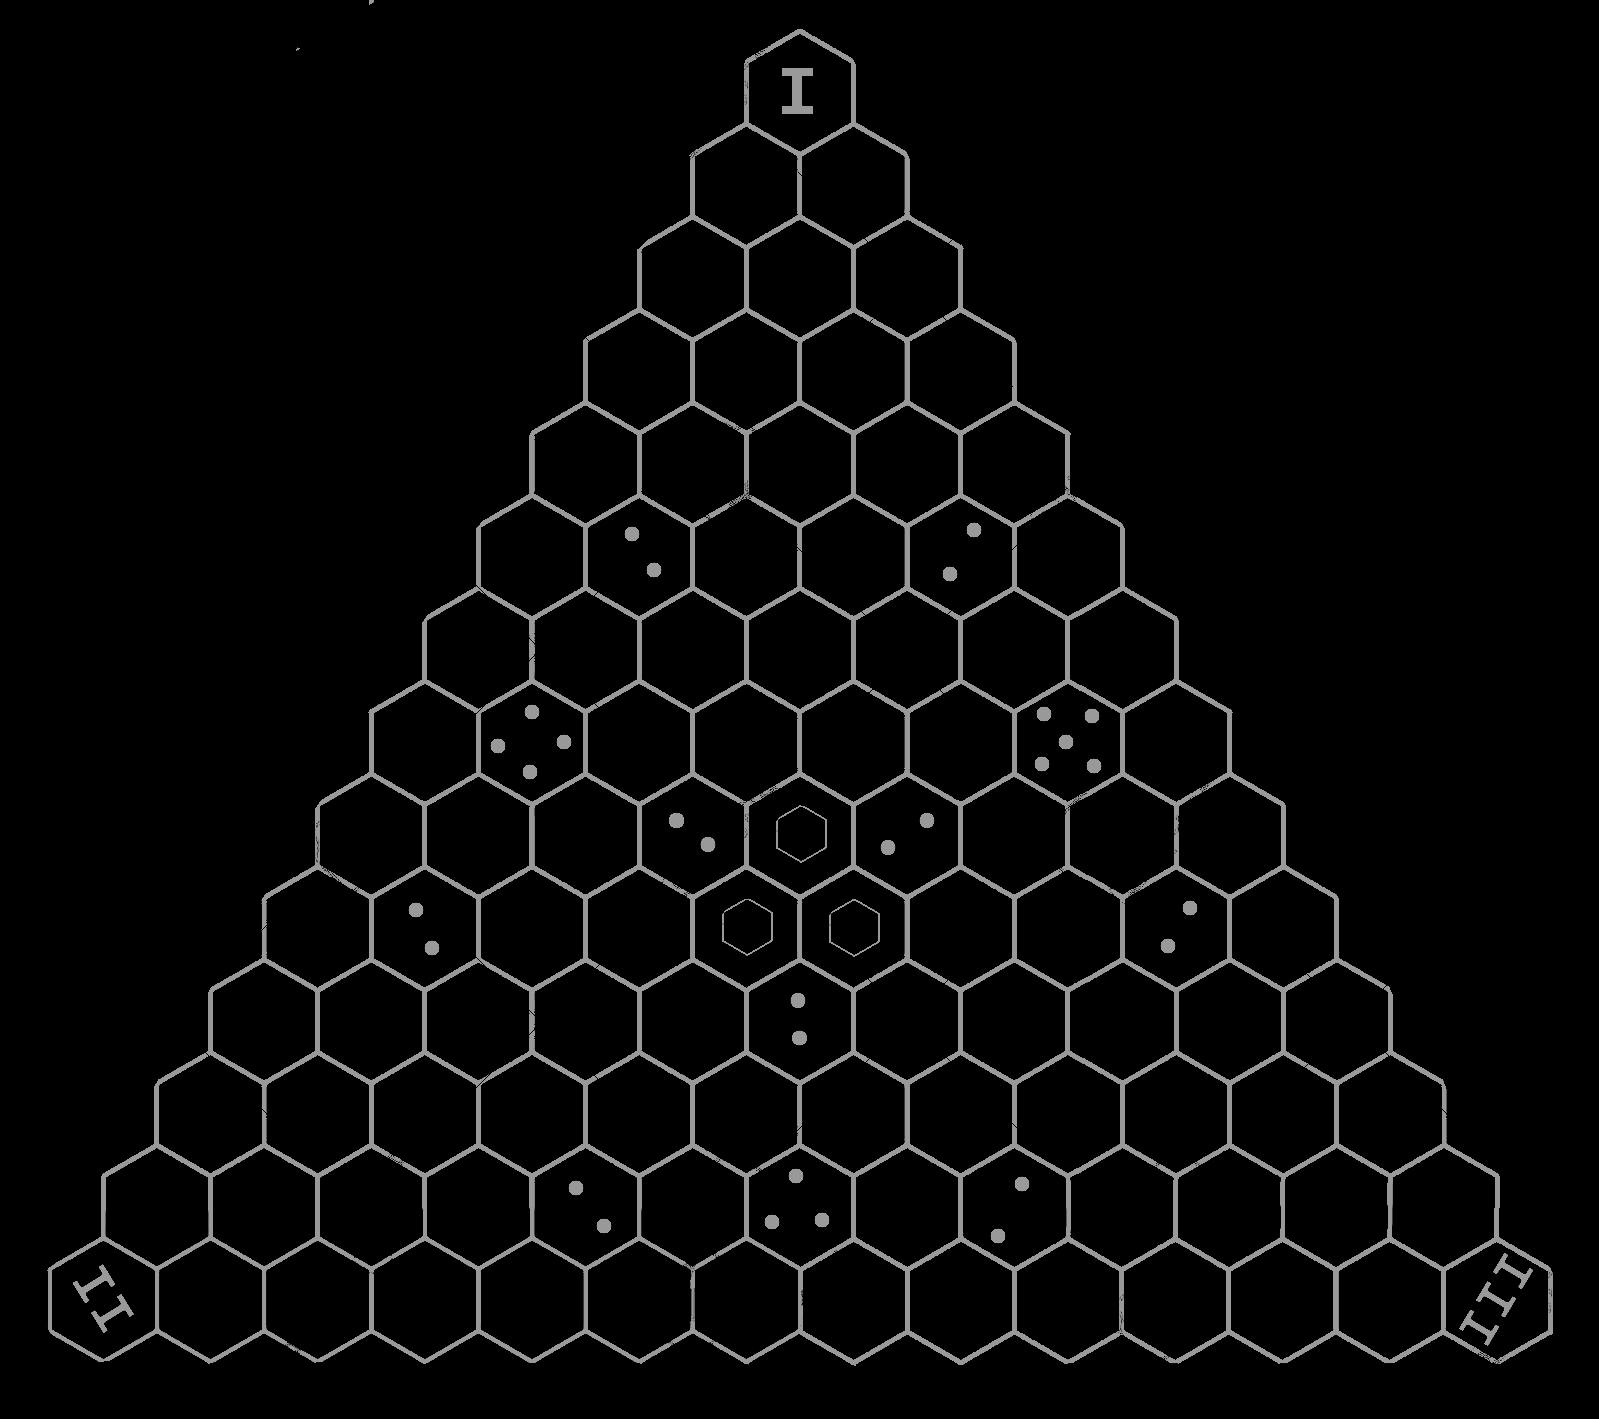
  • 3 Corner Positions: I (top), II (bottom-left), III (bottom-right)
  • Centre Cluster: 3 adjacent hexes at the geometric centre
  • Triangular shape creates 3 natural "lanes" toward the centre
  • Asymmetric distances balanced through reverse turn order
Setup
  1. Each player rolls a die. Highest roller chooses corner. (the best corner that has the most chance for points is I then II then III) first, then next, then lowest takes the remaining.
  2. Assign turn order: III goes 1st, II goes 2nd, I goes 3rd
  3. Each player takes 18 tiles (see distribution below) in their opaque bag.
  4. Draw 3 tiles for starting hand. Maintain 3 tiles throughout.
Tile Distribution (18 tiles each)
TilePtsQty TilePtsQty
Star-651 X-Cross41
Spread41 Arrow31
Y-Right31 Y-Left31
Tri-Branch32 Straight22
Angle22 L-Curve22
Block12 Wildcardvar1

Wildcard: Declared as any standard tile type at placement. Value = declared tile's points.

Turn Order
Corner I goes 3rd (last) Corner II goes 2nd Corner III goes 1st (first) Order: IIIIII → repeat
Goal
First to create a continuous path from your starting corner to any one of the 3 centre hexes wins immediately. Connection must be at a flat-edge midpoint.
Triangle Board

Tri-Board: 14 hexes/side, 3 corners (I, II, III), 3 centre hexes

Blocking (3-Player)
  • Block tiles may be placed on any empty hex adjacent to at least one existing tile — not just your own path.
  • Blocks do not need to be adjacent to your own tiles.
  • Every block helps one opponent while hurting another — choose wisely!
Shared Centre Tiebreaker

If two players connect to the same centre hex simultaneously:

  1. Compare total tile point value of all tiles in each path. Higher wins.
  2. If tied, compare number of dot hexes touched along each path.
  3. If still tied, the player who went earlier in turn order wins.

Note: Two players can each connect to different centre hexes simultaneously. In casual play, this is a shared victory.

Dot Scoring (Tri-Board)

Dot hexes award flat bonus points (not multipliers). Base win = 10 pts.

Dots Bonus
●● 2 +3 pts
●●● 3 +4 pts
●●●● 4 +5 pts
●●●●● 5 +6 pts

Example: Path through 2-dot + 4-dot hexes = 10 + 3 + 5 = 18 points

Draw Resolution

If all 91 hexes fill with no winner:

  1. Closest to Centre: Count tiles in longest connected path toward any centre hex. Fewest remaining hexes wins.
  2. Highest Tile Point Sum: Sum point values of all tiles on longest path. Higher wins.
  3. Most Dot Hexes Touched: Count dot hexes on longest path. More wins.
  4. True Draw: If all tied, the game is a three-way draw.
2-Player Tri-Board Variant
  • Players use Corners II and III as starting positions.
  • Corner I becomes a "dead zone" — no starting tile, not a transit point.
  • Goal: First to reach any centre hex.
  • Turn order: Corner III goes first (longer path), then alternate.
  • Each player uses a full 22-tile standard set.
  • Standard Race Mode blocking rules apply.
  • Scoring uses Tri-Board flat dot bonuses.
Position Strategy Quick Guide
  • Position I (goes last): Focus on efficiency. Build shortest route. Block only if directly threatened.
  • Position II (goes 2nd): Watch both opponents. Pivot toward whichever centre hex is least contested.
  • Position III (goes 1st): Use first-move privilege. Claim prime centre real estate early with Star-6 or X-Cross.